Quantcast
Channel: Network and Security Virtualization
Viewing all 481 articles
Browse latest View live

VMware to Showcase NSX Service Mesh with Enterprise PKS at KubeCon EMEA

$
0
0

Go Beyond Microservices with NSX Service Mesh

Based on Istio and Envoy, VMware NSX Service Mesh provides discovery, visibility, control, and security of end-to-end transactions for cloud native applications. Announced at KubeCon NA 2018, NSX Service Mesh is currently in private Beta and interested users may sign up here.

The design for NSX Service Mesh extends beyond microservices to include end-users accessing applications, data stores, and sensitive data elements. NSX Service Mesh also introduces federation for containerized applications running on multiple VMware Kubernetes environments, across on-premises and public clouds. This enables improved operations, security, and visibility for containerized applications running on clusters across multiple on-premises and public clouds – with centrally defined and managed configuration, visuals, and policies.

Enterprises can leverage a number of different capabilities including:

  • Traffic management
  • mTLS encryption
  • Application SLO policies and resiliency controls
  • Progressive roll outs
  • Automated remediation workflows

Achieve Operational Consistency with Federated Service Mesh

At Google Cloud Next, VMware and Google demonstrated how a hybrid cloud solution can use a federated service mesh across Kubernetes clusters on VMware Enterprise PKS and GKE. This highlighted one example deployment for how enterprise teams can achieve consistent operations and security for cloud native applications and data.

To learn more, see the full blog on VMware and Google Showcase Hybrid Cloud Deployment for Application Platform and Developer Teams or watch the recorded session from Google Cloud Next on YouTube.

Integration Across VMware’s Kubernetes Offering

NSX Service Mesh is tightly integrated across VMware’s Kubernetes offering – VMware PKS, which includes Essential PKS, Enterprise PKS, and Cloud PKS editions, providing customized, turnkey, and SaaS based Kubernetes consumption models respectively that simplify deployment, configuration, upgrade, and scaling of Kubernetes clusters and containerized applications. VMware Enterprise PKS runs on vSphere, AWS, GCP, and Azure, providing enterprises with consistent control across on-prem and public cloud deployments of Kubernetes. Enterprise PKS also comes with VMware NSX-T Data Center, providing advanced container networking and security functions to Kubernetes clusters and pods.

With PKS, NSX Data Center, and NSX Service Mesh, VMware provides a unified, full-stack solution covering networking and security from infrastructure to application layer (L2 to L7), for virtual machines (VMs) and containers.  Enterprises no longer need to take the DIY approach of integrating multiple software from different sources and face the Day 2 operational tasks of maintenance and upgrades for all the components. VMware makes it easy for enterprises to deploy and operationalize a complete stack.

VMware at KubeCon 2019

This year at KubeCon Europe in Barcelona, we are excited to showcase federation for PKS clusters across on-premises and public clouds, and NSX Data Center for container networking. We look forward to seeing you at the VMware Booth (D2) to show you demos on PKS, NSX Data Center, and NSX Service Mesh.

Follow us for additional updates at the VMware Network Virtualization blog and on Twitter @VMwareNSX  during the week of KubeCon EMEA.  See you at Barcelona!

The post VMware to Showcase NSX Service Mesh with Enterprise PKS at KubeCon EMEA appeared first on Network Virtualization.


VMware Cloud on AWS SDDC 1.7: New NSX Features

$
0
0

The latest version of VMware Cloud on AWS SDDC (SDDC Version 1.7) was released recently and is being rolled out to customers. In this post, I’ll discuss the new NSX Networking and Security features.

Looking at the features released in VMware Cloud on AWS SDDC 1.7 in the below diagram, we can see the features can be grouped into three categories: Connectivity, Services, and Operations. Further below I go into more detail in each of these specific NSX features. For a complete list of all new features in VMware Cloud on AWS SDDC 1.7 in general, check out the release notes here

Figure 1: VMware Cloud on AWS SDDC 1.7 NSX Features

Figure 1: VMware Cloud on AWS SDDC 1.7 NSX Features


Connectivity

1.) Direct Connect with VPN as Standby
This feature enables customers to utilize Direct Connect Private VIF with Route Based IPSEC VPN as Standby. To enable this, Direct Connect Private VIF can be configured with Route Based IPSEC VPN as Standby for non-ESXi and non-vMotion traffic. Prior to VMware Cloud on AWS SDDC 1.7, customers could not use VPN as standby for Direct Connect Private VIF.

Typically customers want to leverage the high bandwidth, low latency Direct Connect Private VIF connectivity for all traffic and use VPN as standby. However, prior to SDDC 1.7 and also default behavior in SDDC 1.7 is that when the same network is learned over both Direct Connect Private VIF and Route Based IPSEC VPN, routes learned over Route Based IPSEC VPN are preferred; this is because routes learned over Route Based IPSEC VPN are given a better administrative distance. This enables topologies such as the below where customers can configure Route Based IPSEC VPN over Direct Connect Private VIF providing for encryption over Direct Connect for Compute and Management Appliance traffic.

It’s important to note that whenever Direct Connect Private VIF is used, ESXi Management and vMotion traffic always goes over Direct Connect Private VIF; this is true even if route based IPSEC VPN is used in conjunction with Direct Connect Private VIF. ESXi Management traffic and vMotion traffic will always go over the high bandwidth, low latency Direct Connect Private VIF connection by design and cannot be rerouted over the Route Based IPSEC VPN connection.

Figure 2: VMware Cloud on AWS with Route Based IPSEC VPN over Direct Connect Private VIF

Figure 2: VMware Cloud on AWS with Route Based IPSEC VPN over Direct Connect Private VIF

With VMware Cloud on AWS SDDC 1.7, under the Direct Connect tab as shown below, customers can enable the Use VPN as backup to Direct Connect option. 

Figure 3: VPN as backup to Direct Connect Option Enabled

Figure 3: VPN as backup to Direct Connect Option Enabled

By enabling the Use VPN as backup to Direct Connect option, routes learned over Direct Connect Private VIF are given better administrative distance than routes learned over Route Based IPSEC VPN. This allows for the below topology where Route Based IPSEC VPN can be used as backup to Direct Connect Private VIF. Note, as mentioned prior, ESXi management and vMotion traffic will always go over the Direct Connect Private VIF connection, so this feature is really providing backup for management appliance traffic (Ex: vCenter) and compute/workload traffic which is typically what customers are most concerned about.

Figure 4: VPN being used as backup to Direct Connect for management appliance and compute traffic

Figure 4: VPN being used as backup to Direct Connect for management appliance and compute traffic

It’s also important to note that when the Use VPN as backup to Direct Connect option is enabled, the traffic egressing the SDDC is preferring the Direct Connect Private VIF connection over the Route Based IPSEC VPN connection. However, on-prem, for traffic ingressing the SDDC, customers must also prefer the routes learned over Direct Connect Private VIF over the routes learned over the Route Based IPSEC VPN connection.

This is a great new feature for VMware Cloud on AWS SDDC, however, it’s important to understand when this feature should be used. Below points are important to note.

1.) Typically when customers have 2 x Direct Connect (DX) Private VIFs, they will be going to different Direct Connect (DX) circuits and customer already has redundancy/backup.

– Route Based IPSEC VPN as standby is not very useful in this scenario

2.) If customer is trying to save cost and only has 1 x Direct Connect (DX) Private VIF, VPN as standby can be very useful for providing backup to Direct Connect Private VIF.
– Customer should note bandwidth used by workloads on Direct Connect Private VIF to ensure VPN bandwidth is sufficient


2.) ECMP for Route Based IPSEC VPN

Another great feature for connectivity provided in the 1.7 SDDC release is ECMP for Route Based IPSEC VPN. This feature is primarily targeted for use with AWS Transit Gateway (TGW). If you are not familiar with AWS TGW, please read my prior post, VMware Cloud on AWS with Transit Gateway Demo.

Prior to 1.7 SDDC, customers could use VPN attachments to VMware Cloud on AWS but had to deploy Route Based IPSEC VPN in Active/Standby mode in VMware Cloud on AWS SDDC; the TGW also had to be deployed without ECMP enabled.

Now that VMware Cloud on AWS SDDC supports ECMP with route based IPSEC VPN, customers can deploy TGW with ECMP and leverage up to 4 Route Based IPSEC VPN tunnels doing ECMP for increased bandwidth and resiliency; an example deployment using 4 Route Based IPSEC VPN tunnels from VMware Cloud on AWS SDDC to native AWS VPC is shown below.

Figure 5: 4 x Route Based IPSEC VPN tunnels doing ECMP with AWS TGW

Figure 5: 4 x Route Based IPSEC VPN tunnels doing ECMP with AWS TGW

Services

3.) DHCP Relay

Prior to 1.7 SDDC, customers could only use the native NSX DHCP capability where simple configurations such as defining IP ranges for workloads on specific network segments could be done. With the recent 1.7 SDDC release, customers can now leverage DHCP relay to allow for using their own advanced 3rd party DHCP server. On the VMware Cloud on AWS console below, you can see a new menu item on the left called DHCP.

Figure 6: DHCP Relay Menu Item on VMware Cloud on AWS SDDC Console

Figure 6: DHCP Relay Menu Item on VMware Cloud on AWS SDDC Console

Below you can see DHCP Relay being configured.

Figure 7: VMware Cloud on AWS SDDC - DHCP Relay Configuration

Figure 7: VMware Cloud on AWS SDDC – DHCP Relay Configuration

A few important things to note about DHCP Relay:

  • Customers have a choice to use the native NSX DHCP capabilities in VMware Cloud on AWS or to use DHCP Relay to leverage an advanced external/3rd party DHCP server; it is not possible to use both
  • To enable DHCP Relay, the Attach to Compute Gateway option must be checked; it is unchecked by default. DHCP Relay cannot be enabled if there are any network segments using the native NSX DHCP capabilities; those respective network segments must be deleted first
  • DHCP Server can sit in the SDDC on a NSX network segment, on-prem, or even in connected VPC – requirement is that it must be routable to
  • Multiple DHCP Server IP addresses can be configured for DHCP Relay; the first server IP address listed will be tried first; if destination is unreachable, the second IP address will be tried and so on

Below, you can see a network segment is being created; note, DHCP has to also be enabled on this network segment as shown below. Also, DHCP IP Range needs to be entered here; however, this IP range is only for documentation on what IP addresses are used for the network segment. The actual IP address is received and managed from the 3rd party DHCP Server configured in the DHCP Relay configuration.

Figure 8: VMware Cloud on AWS SDDC - Network Segment Using DHCP Relay

Figure 8: VMware Cloud on AWS SDDC – Network Segment Using DHCP Relay

The new DHCP Relay functionality is useful for many important use cases like VDI where desktops are quickly provisioned for use and effective IP address management is critical.

Operations

4.) NSX-T APIs available in API Explorer

With VMware Cloud on AWS 1.7 SDDC, the NSX-T APIs can be found and used within the VMware Cloud on AWS SDDC’s API Explorer. Customers can easily lookup and test NSX-T APIs directly from API Explorer.

You can see from the below screenshot, there are two NSX-T APIs, NSX VMC Policy API and NSX VMC AWS Integration APINSX VMC Policy API includes all the NSX Networking and Security APIs for the NSX capabilities within the SDDC. NSX VMC AWS Integration API includes APIs that are specific to AWS like Direct Connect.

Figure 9: VMware Cloud on AWS SDDC NSX APIs

Figure 9: VMware Cloud on AWS SDDC NSX APIs

Below you can see, from API Explorer, customers can see a list of respective API calls and even enter parameters and execute the call on the respective SDDC.

Figure 10: API Explorer - NSX-T API call to display CGW firewall rules

Figure 10: API Explorer – NSX-T API call to display CGW firewall rules

Figure 11 below displays API Explorer and the execution and results of a NSX-T API call to display CGW firewall rules. Note, customer can quickly test and execute API calls directly from the API Explorer.

Figure 11: API Explorer - Execution and results of NSX-T API call to display CGW firewall rules

Figure 11: API Explorer – Execution and results of NSX-T API call to display CGW firewall rules

From the below screenshot, you can see the NSX-T API call executed returned specific CGW firewall rules and respective details.

Figure 12: API Explorer - Exploring API call results of NSX-T API call to display CGW firewall rules

Figure 12: API Explorer – Exploring API call results of NSX-T API call to display CGW firewall rules

The above example used the NSX VMC Policy API which includes all the NSX Networking and Security  APIs for the NSX capabilities within the SDDC. The below example uses the NSX VMC AWS Integration API which includes APIs that are specific to AWS like Direct Connect. You can see an API has been executed to retreive Direct Connect BGP related information. The results show that routes learned over VPN are preferred over routes learned via Direct Connect Private VIF. Thus, the Use VPN as backup to Direct Connect option is not enabled and VPN is not being used as Standby for Direct Connect Private VIF.

Figure 13: API Explorer - Executing API to retreive Direct Connect BGP related information

Figure 13: API Explorer – Executing API to retreive Direct Connect BGP related information

Additionally, as shown below, it is easy to search for APIs in API Explorer. Below, the APIs are searched for tag, and an NSX-T API is returned for applying NSX Security Tags to workloads.

Figure 14: API Explorer - API search capability

Figure 14: API Explorer – API search capability

Finally, the VMware Cloud on AWS NSX-T API documentation has been updated. At this link you can see NSX-T APIs for VMware Cloud on AWS; the structure/layout is the same as seen in API Explorer where you have both NSX VMC Policy API and NSX VMC AWS Integration API.

Figure 15: Updated VMware Cloud on AWS NSX-T API Documentation

Figure 15: Updated VMware Cloud on AWS NSX-T API Documentation

Clicking into one of the APIs, you can see the APIs are also organized based on category and color coded to make it easier to locate respective APIs.

Figure 16: Organized VMware Cloud on AWS NSX-T API Documentation

Figure 16: Organized VMware Cloud on AWS NSX-T API Documentation


As you can see, there are a lot of useful NSX enhancements in SDDC 1.7. Checkout the VMware Cloud on AWS website or below links for more information.

My Blogs on VMware Network Virtualization Blog

My blogs on HumairAhmed.com

Follow me on Twitter: @Humair_Ahmed

The post VMware Cloud on AWS SDDC 1.7: New NSX Features appeared first on Network Virtualization.

NSX-T Infrastructure Deployment Using Ansible

$
0
0

VMware NSX-T Data Center 2.4 was a major release adding new functionality for virtualized network and security for public, private and hybrid clouds. The release includes a rich set of features including IPv6 support, context-aware firewall, network introspection features, a new intent-based networking user interface and many more.

Along with these features, another important infrastructure change is the ability to deploy highly-available clustered management and control plane.

NSX-T 2.4 Unified Appliance Cluster

What is the Highly-Available Cluster?

The highly-avilable cluster consists of three NSX nodes where each node contains the management plane and control plane services. The three nodes form a cluster to give a highly-available management plane and control plane. It provides application programming interface (API) and graphical user interface (GUI) for clients. It can be accessed from any of the manager or a single VIP associated with the cluster. The VIP can be provided by NSX or can be created using an external Load Balancer. It makes operations easier with less systems to monitor, maintain and upgrade.

Besides a NSX cluster, you will have to create Transport Zones, Host and Edge Transport Nodes to consume NSX-T Data Center.

  • A Transport Zone defines the scope of hosts and virtual machines (VMs) for participation in the network.
  • Transport Node is a node that is capable of participating in an NSX-T Data Center overlay or NSX-T Data Center VLAN networking (Edge, Hypervisor, Bare-metal)

You can, of course, manually deploy the three NSX-T node cluster, create Transport Zones and Transport Nodes and make it ready for consumption going through GUI workflows. The better approach is through automation. It will it a lot faster and less error prone.

You can completely automate the deployment today using VMware’s NSX-T Ansible Modules.

NSX-T with Ansible


What is Ansible?

Ansible is an agent-less IT-automation engine that works over secure shell (SSH). Once installed, there are no databases to configure and there are no daemons to start or keep running.

Ansible performs automation and orchestration via Playbooks. Playbooks are a YAML definition of automation tasks that describe how a particular piece of work needs to be done. A playbook consists of a series of ‘plays’ that define automation across a set of hosts, known as ‘inventory’. Each ‘play’ consists of multiple ‘tasks’ that can target one or many hosts in the inventory. Each task is a call to an Ansible module.

Ansible modules interact with NSX-T Data Center using standard representational state transfer (REST) APIs and the only requirement is IP connectivity to NSX-T Data Center.


Ansible Install

First, identify an Ansible control machine to run Ansible on. It can be a virtual machine, a container or your laptop. Ansible supports a variety of operating systems as its control machine. A full list and instructions can be found here.

VMware’s NSX-T Ansible modules use OVFTool to interact with vCenter Server to deploy the NSX Manager VMs. Once Ansible is installed on the control machine, download OVFTool and install by executing the binary. Other required packages can be easily installed with:

pip install --upgrade pyvmomi pyvim requests

VMware’s NSX-T Ansible modules are completely supported by VMware and is available for download from the official download site. It can also be downloaded from the GitHub repository.


Deploying the First NSX-T Node

Now that you have an environment ready, lets jump right in and see how we can deploy the first NSX-T node. The playbook shown below deploys the first node and waits for all the required services to come online. The playbook and the variables file required to deploy the first NSX-T node is part of the GitHub repository and can be found under the examples folder.

$> cat 01_deploy_first_node.yml
---
#
# Playbook to deploy the first NSX Appliance node. Also checks the node
# status
#
- hosts: 127.0.0.1
  connection: local
  become: yes
  vars_files:
    - deploy_nsx_cluster_vars.yml
  tasks:
    - name: deploy NSX Manager OVA
      nsxt_deploy_ova:
        ovftool_path: "/usr/bin"
        datacenter: "{{ nsx_node1['datacenter'] }}"
        datastore: "{{ nsx_node1['datastore'] }}"
        portgroup: "{{ nsx_node1['portgroup'] }}"
        cluster: "{{ nsx_node1['cluster'] }}"
        vmname: "{{ nsx_node1['hostname'] }}"
        hostname: "{{ nsx_node1['hostname'] }}"
        dns_server: "{{ dns_server }}"
        dns_domain: "{{ domain }}"
        ntp_server: "{{ ntp_server }}"
        gateway: "{{ gateway }}"
        ip_address: "{{ nsx_node1['mgmt_ip'] }}"
        netmask: "{{ netmask }}"
        admin_password: "{{ nsx_password }}"
        cli_password: "{{ nsx_password }}"
        path_to_ova: "{{ nsx_ova_path }}"
        ova_file: "{{ nsx_ova }}"
        vcenter: "{{ compute_manager['mgmt_ip'] }}"
        vcenter_user: "{{ compute_manager['username'] }}"
        vcenter_passwd: "{{ compute_manager['password'] }}"
        deployment_size: "small"
        role: "nsx-manager nsx-controller"

    - name: Check manager status
      nsxt_manager_status:
          hostname: "{{ nsx_node1['hostname'] }}"
          username: "{{ nsx_username }}"
          password: "{{ nsx_password }}"
          validate_certs: "{{ validate_certs }}"
          wait_time: 50

All variables referenced in the playbook are defined in the file deploy_nsx_cluster_vars.yml. The relevant variables corresponding to the playbook above are:

$> cat deploy_nsx_cluster_vars.yml
{
  "nsx_username": "admin",
  "nsx_password": "myPassword!myPassword!",
  "validate_certs": False,

  "nsx_ova_path": "/home/vmware",
  "nsx_ova": "nsx-unified-appliance-2.4.0.0.0.12456291.ova",

  "domain": "mylab.local",
  "netmask": "255.255.224.0",
  "gateway": "10.114.200.1",
  "dns_server": "10.114.200.8",
  "ntp_server": "10.114.200.8",

  "nsx_node1": {
    "hostname": "mynsx-01.mylab.local",
    "mgmt_ip": "10.114.200.11",
    "datacenter": "Datacenter",
    "cluster": "Management",
    "datastore": "datastore1",
    "portgroup": "VM Network"
  }
}

All variables are replaced using Jinja2 substitution. Once you have the variables file customized, copy the file 01_deploy_first_node.yml and the customized variables file deploy_nsx_cluster_vars.yml to the main Ansible folder (two-levels up). Running the playbook to deploy your very first NSX-T node is done with a single command:

ansible-playbook 01_deploy_first_node.yml -v

The -v in the above command gives a verbose output. You can chose to ignore the -v altogether or increase the verbosity by giving in more ‘v‘s: ‘-vvvv‘. The playbook deploys a NSX Manager node, configures it and checks to make sure all required services are up. You now have a fully functional single-node NSX node! You can now access the new simplified UI by accessing the node’s IP or FQDN.


Configuring the Compute Manager

Configuring a Compute Manager to your NSX makes it very easy to prepare your Hosts as a Transport Node. With NSX-T Data Center, you can configure one or more vCenter servers with your NSX Manager. In the playbook below, we invoke the module nsxt_fabric_compute_managers on items defined in compute_managers:

$> cat02_configure_compute_manager.yml
---
#
# Playbook to register Compute Managers with NSX Appliance
#
- hosts: 127.0.0.1
  connection: local
  become: yes
  vars_files:
    - deploy_nsx_cluster_vars.yml
  tasks:
    - name: Register compute manager
      nsxt_fabric_compute_managers:
          hostname: "{{ nsx_node1.hostname }}"
          username: "{{ nsx_username }}"
          password: "{{ nsx_password }}"
          validate_certs: "{{ validate_certs }}"
          display_name: "{{ item.display_name }}"
          server: "{{ item.mgmt_ip }}"
          origin_type: "{{ item.origin_type }}"
          credential:
            credential_type: "{{ item.credential_type }}"
            username: "{{ item.username }}"
            password: "{{ item.password }}"
          state: present
      with_items:
        - "{{compute_managers}}"

The with_items tells Ansible to loop to all available Compute Managers and add each of them, one-by-one. The corresponding variables rare:

"compute_managers": [
    {
      "display_name": "vcenter-west",
      "mgmt_ip": "10.114.200.6",
      "origin_type": "vCenter",
      "credential_type": "UsernamePasswordLoginCredential",
      "username": "administrator@mylab.local",
      "password": "myFirstPassword!"
    },
    {
      "display_name": "vcenter-east",
      "mgmt_ip": "10.114.200.8",
      "origin_type": "vCenter",
      "credential_type": "UsernamePasswordLoginCredential",
      "username": "administrator@mylab.local",
      "password": "mySecondPassword!"
    }
  ]

Running the playbook is similar to before. Just copy over the 02_configure_compute_manager.yml to the main Ansible folder and run it:

ansible-playbook 02_configure_compute_manager.yml -v

Once the play is complete, you will see 2 vCenters configured with your NSX Manager.


Forming the NSX Cluster

To form a NSX Cluster, you have to deploy 2 more nodes. Again, we use a playbook specifically written for this:

$> cat 03_deploy_second_third_node.yml
---
#
# Deploys remaining NSX appliance nodes and forms a cluster. Requires the first
# NSX appliance node to be deployed and at least one Compute Manager registered.
#
- hosts: 127.0.0.1
  connection: local
  become: yes
  vars_files:
    - deploy_nsx_cluster_vars.yml
  tasks:
    - name: Deploying additional nodes
      nsxt_controller_manager_auto_deployment:
          hostname: "{{ nsx_node1.hostname }}"
          username: "{{ nsx_username }}"
          password: "{{ nsx_password }}"
          validate_certs: "{{ validate_certs }}"
          deployment_requests:
          - roles:
            - CONTROLLER
            - MANAGER
            form_factor: "SMALL"
            user_settings:
              cli_password: "{{ nsx_password }}"
              root_password: "{{ nsx_password }}"
            deployment_config:
              placement_type: VsphereClusterNodeVMDeploymentConfig
              vc_name: "{{ compute_managers[0]['display_name'] }}"
              management_network_id: "{{ item.portgroup_moid }}"
              hostname: "{{ item.hostname }}"
              compute_id: "{{ item.cluster_moid }}"
              storage_id: "{{ item.datastore_moid }}"
              default_gateway_addresses:
              - "{{ gateway }}"
              dns_servers:
              - "{{ dns_server }}"
              ntp_servers:
              - "{{ ntp_server }}"
              management_port_subnets:
              - ip_addresses:
                - "{{ item.mgmt_ip }}"
                prefix_length: "{{ item.prefix }}"
          state: present
      with_items:
        - "{{ additional_nodes }}"

As before, we invoke the module multiple times, once each with items defined in additional_nodes. Running the playbook again is a simple step:

ansible-playbook 03_deploy_second_third_node.yml -v

You now have a 3 node highly-available cluster. No need for you to deal with any cluster joins or node UUIDs.


Configure Transport Zone, Transport Nodes and Edge Clusters

At this point, you are ready to deploy the rest of the logical entities required to consume your NSX deployment. Here, I have defined all the tasks required to deploy Transport Zones, Transport Nodes (which includes Host Nodes and Edge Nodes) and Edge Clusters:

$> cat setup_infra.yml
---
- hosts: 127.0.0.1
  connection: local
  become: yes
  vars_files:
    - setup_infra_vars.yml
  tasks:
    - name: Create transport zone
      nsxt_transport_zones:
        hostname: "{{ nsx_node1.mgmt_ip }}"
        username: "{{ nsx_username }}"
        password: "{{ nsx_password }}"
        validate_certs: "{{ validate_certs }}"
        resource_type: "TransportZone"
        display_name: "{{ item.display_name }}"
        description: "{{ item.description }}"
        transport_type: "{{ item.transport_type }}"
        host_switch_name: "{{ item.host_switch_name }}"
        state: "{{ state }}"
      with_items:
        - "{{ transport_zones }}"

    - name: Create IP Pools
      nsxt_ip_pools:
        hostname: "{{ nsx_node1.mgmt_ip }}"
        username: "{{ nsx_username }}"
        password: "{{ nsx_password }}"
        validate_certs: "{{ validate_certs }}"
        display_name: "{{ item.display_name }}"
        subnets: "{{ item.subnets }}"
        state: "{{ state }}"
      with_items:
        - "{{ ip_pools  }}"

    - name: Create Transport Node Profiles
      nsxt_transport_node_profiles:
        hostname: "{{ nsx_node1.mgmt_ip }}"
        username: "{{ nsx_username }}"
        password: "{{ nsx_password }}"
        validate_certs: "{{ validate_certs }}"
        resource_type: TransportNodeProfile
        display_name: "{{ item.display_name }}"
        description: "{{ item.description }}"
        host_switch_spec:
          resource_type: StandardHostSwitchSpec
          host_switches: "{{ item.host_switches }}"
        transport_zone_endpoints: "{{ item.transport_zone_endpoints }}"
        state: "{{ state }}"
      with_items:
        - "{{ transport_node_profiles }}"

    - name: Create Transport Nodes
      nsxt_transport_nodes:
        hostname: "{{ nsx_node1.mgmt_ip }}"
        username: "{{ nsx_username }}"
        password: "{{ nsx_password }}"
        validate_certs: "{{ validate_certs }}"
        display_name: "{{ item.display_name }}"
        host_switch_spec:
          resource_type: StandardHostSwitchSpec
          host_switches: "{{ item.host_switches }}"
        transport_zone_endpoints: "{{ item.transport_zone_endpoints }}"
        node_deployment_info: "{{ item.node_deployment_info }}"
        state: "{{ state }}"
      with_items:
        - "{{ transport_nodes }}"

    - name: Add edge cluster
      nsxt_edge_clusters:
        hostname: "{{ nsx_node1.mgmt_ip }}"
        username: "{{ nsx_username }}"
        password: "{{ nsx_password }}"
        validate_certs: "{{ validate_certs }}"
        display_name: "{{ item.display_name }}"
        cluster_profile_bindings:
        - profile_id: "{{ item.cluster_profile_binding_id }}"
        members: "{{ item.members }}"
        state: "{{ state }}"
      with_items:
        - "{{ edge_clusters }}"

Creation of a Transport Node Profile makes it easier to Configure NSX at a cluster level. In my case, I am assigning IPs to the Transport Nodes using the created IP Pool.

Note that an Edge Node is created as a Transport Node. This means the module that creates a Standalone Transport Node creates an Edge Node too! Of course, the  variables required to create an Edge Node will be slightly different than that of adding a new Host Transport Node. In my example below, you can see the variables required to create an Edge Node.

{
      "display_name": "EdgeNode-01",
      "description": "NSX Edge Node 01",
      "host_switches": [
        {
          "host_switch_profiles": [
            {
              "name": "nsx-edge-single-nic-uplink-profile",
              "type": "UplinkHostSwitchProfile"
            },
            {
              "name": "LLDP [Send Packet Disabled]",
              "type": "LldpHostSwitchProfile"
            }
          ],
          "host_switch_name": "nvds",
          "pnics": [
            {
              "device_name": "fp-eth0",
              "uplink_name": "uplink-1"
            }
          ],
          "ip_assignment_spec":
            {
              "resource_type": "StaticIpPoolSpec",
              "ip_pool_name": "TEP-IP-Pool"
            }
        }
      ],
      "transport_zone_endpoints": [
        {
          "transport_zone_name": "Overlay-TZ"
        }
      ],
      "node_deployment_info": {
        "deployment_type": "VIRTUAL_MACHINE",
        "deployment_config": {
          "vm_deployment_config": {
            "vc_name": "vcenter",
            "compute_id": "domain-c7",
            "storage_id": "datastore-21",
            "host_id": "host-20",
            "management_network_id": "network-16",
            "hostname": "edgenode-01.lab.local",
            "data_network_ids": [
              "network-16",
              "dvportgroup-24",
              "dvportgroup-24"
            ],
            "management_port_subnets": [
              {
                "ip_addresses": [ "10.114.200.16" ],
                "prefix_length": 27
              }
            ],
            "default_gateway_addresses": [ "10.114.200.1" ],
            "allow_ssh_root_login": true,
            "enable_ssh": true,
            "placement_type": "VsphereDeploymentConfig"
          },
          "form_factor": "MEDIUM",
          "node_user_settings": {
            "cli_username": "admin" ,
            "root_password": "myPassword1!myPassword1!",
            "cli_password": "myPassword1!myPassword1!",
            "audit_username": "audit",
            "audit_password": "myPassword1!myPassword1!"
          }
        },
        "resource_type": "EdgeNode",
        "display_name": "EdgeNode-01"
      },
    }

The node_deployment_info block contains all the required fields to deploy an Edge VM. Just like deploying an Edge Node through the UI, ansible module requires that a compute manager be configured with NSX. The module takes cares of deploying the Edge Node and adding it to the NSX management and control plane.

In the example on GitHub, the above tasks of creating the logical entities are split as separate files for easy management. If you want to run all of them together, you can include them in a single playbook:

$> cat run_everything.yml
---
- import_playbook: 01_deploy_transport_zone.yml
- import_playbook: 02_define_TEP_IP_Pools.yml
- import_playbook: 03_create_transport_node_profiles.yml
- import_playbook: 04_create_transport_nodes.yml
- import_playbook: 05_create_edge_cluster.yml

$> ansible-playbook run_everything.yml -v

Deleting Entities

Deleting through Ansible is as easy as creating them. Just change the “state” to “absent” in the variable file. This tells Ansible to remove the entity if it exists.

{
    .
    .
    "state": "absent",
    .
    .
}

Then, run the playbooks in the reverse order:

$> cat delete_everything.yml
---
- import_playbook: 05_create_edge_cluster.yml
- import_playbook: 04_create_transport_nodes.yml
- import_playbook: 03_create_transport_node_profiles.yml
- import_playbook: 02_define_TEP_IP_Pools.yml
- import_playbook: 01_deploy_transport_zone.yml


$> ansible-playbook delete_everything.yml -v


Automating using VMware’s NSX-T Ansible modules makes it very easy to manage your infrastructure. You just have to save the variable files in your favorite version control system. Most importantly, the variable files represent your setup. Therefore, saving it allows you to easily replicate the setup or do a deploy-and-destroy as and when required.


NSX-T Data Center Resources

To learn more information about NSX-T Data Center check out the following resources:

The post NSX-T Infrastructure Deployment Using Ansible appeared first on Network Virtualization.

Kubernetes and VMware Enterprise PKS Networking & Security Operations with NSX-T Data Center

$
0
0


The focus of this blog is VMware Enterprise PKS and Kubernetes Operations with NSX-T Data Center. For the sake of completion, I will start with a high level NSX-T deployment steps without going too much into the details.

This blog does not focus on NSX-T Architecture and Deployment in Kubernetes or Enterprise PKS environments, but it highlights some of those points as needed.

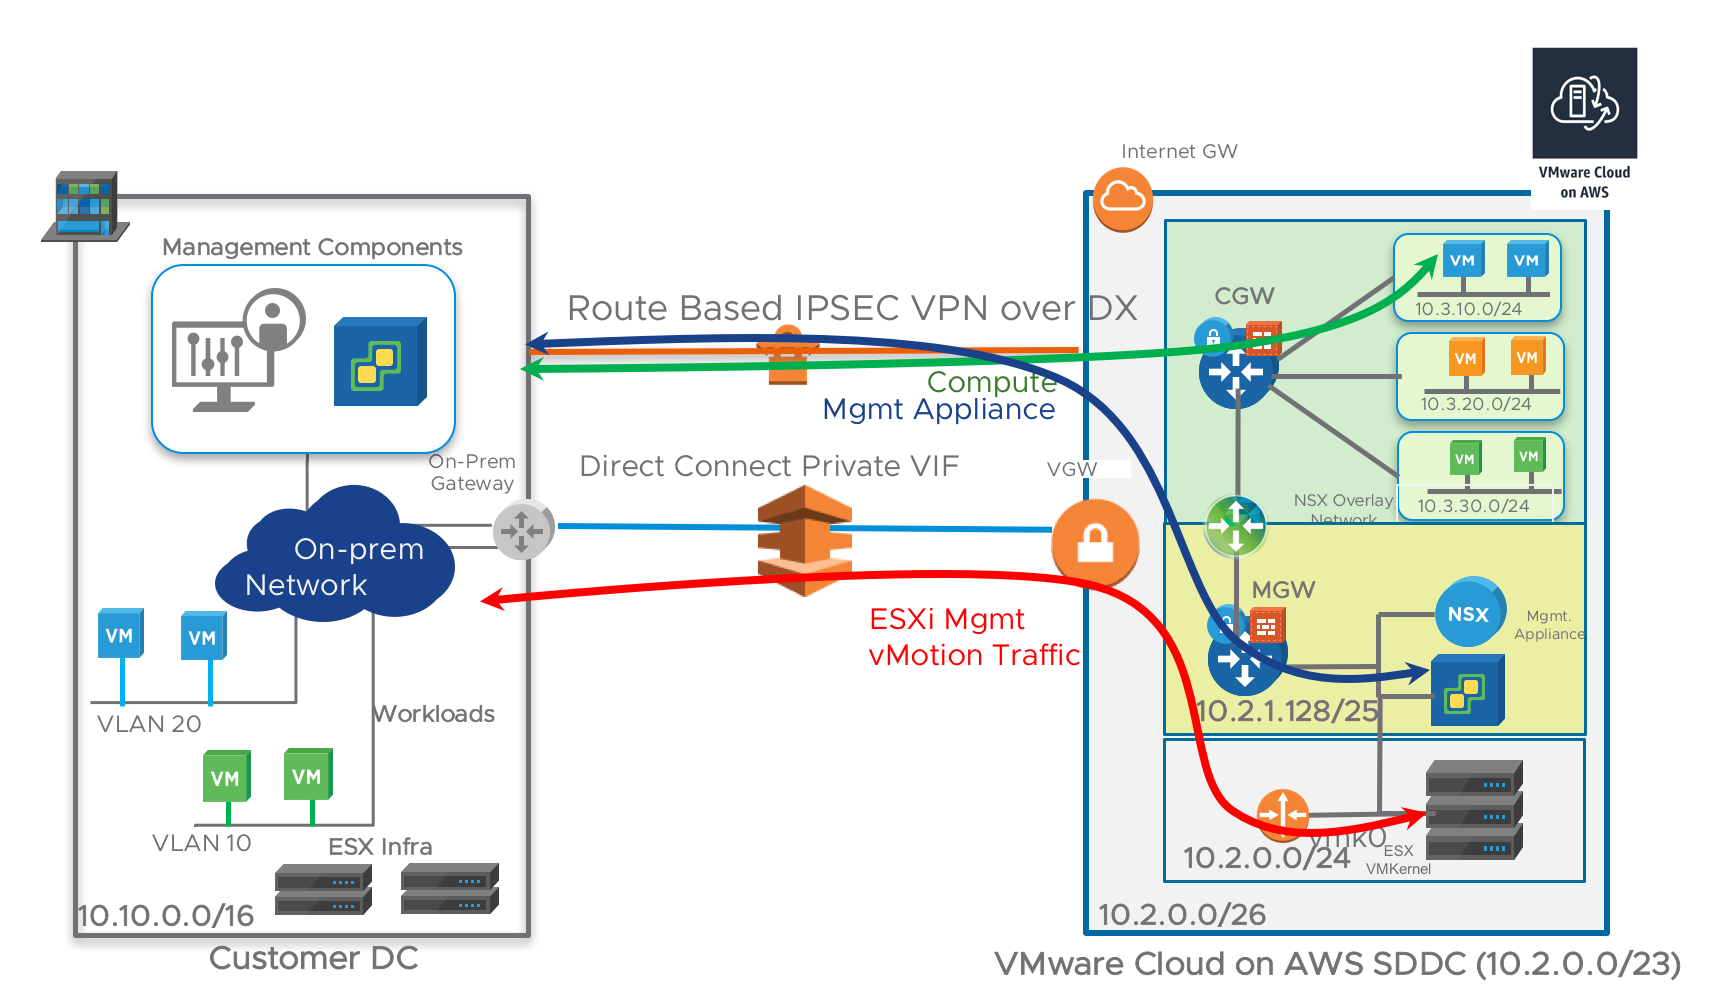
Deploying NSX-T Data Center

There are multiple steps that are required to be configured in NSX-T before deploying Enterprise PKS. At a high level, here are the initial steps of installing NSX-T:

  1. Download NSX-T Unified Appliance OVA.
  2. Deploy NSX-T Manager (Starting from NSX-T 2.4, three managers could be deployed with a Virtual IP).
  3. Add vCenter as a Compute Manager in NSX-T
  4. Deploy NSX-T Controllers. (Starting from NSX-T 2.4 the controllers are merged with NSX-T manager in a single appliance)
  5. Deploy one or more pairs of NSX-T Edges with a minimum of Large Size. (Large Size is required by Enterprise PKS, Bare-Metal Edges could be used too).
  6. Install NSX Packages on ESXi Hosts
  7. Create an Overlay and a VLAN Transport Zones.
  8. Create a TEP IP Pool.
  9. Add ESXi Hosts as a Transport nodes to the Overlay Transport Zone
  10. Add the NSX-T Edge as a Transport Node to the Overlay and VLAN Transport Zone.

All above steps are standard NSX-T Deployment steps and can be achieved from the NSX-T Manager UI.

More info on NSX-T could be found here.

Preparing NSX-T for Enterprise PKS

Before we install PKS, there are multiple objects that we need to create before that. Here is a list for those objects:

  1. Tier-0 Router and establish connectivity to the physical network using BGP or Static routes.
  2. Pods-IP-Block for Kubernetes Pods Internal IP Addresses. (/16 Block)
  3. Nodes-IP-Block for Kubernetes nodes (VMs) IP addresses (/16 Block)
  4. IP-Pool-VIPs for external connectivity and load balancing VIPs. This Pool should be routable in the physical infra. Starting NSX-T 2.4, this Pool could be on the same subnet as the T0-Router Uplink Interface, which simplifies routing in and out the environment. Before NSX-T 2.4, we had to use BGP or create a Static Route to this IP Pool, which sometimes is challenging in a lab environment. Now it could be directly connected to the Physical Network which remove the need for dynamic or static routing. (typically /24, but smaller subnets could be used)
  5. Generating and Registering the NSX Manager Certificate for PKS (steps)
  6. Generating and Registering the NSX Manager Superuser Principal Identity Certificate and Key (steps).
  7. (Optional) Tier-1 Router and Logical switch for PKS Management components*
  8. (Optional) NAT Items*

*Optional steps depend on the design. PKS management VMs could be connected to an NSX-T Logical Switch, or they could be connected to a VDS dPG outside of NSX-T.

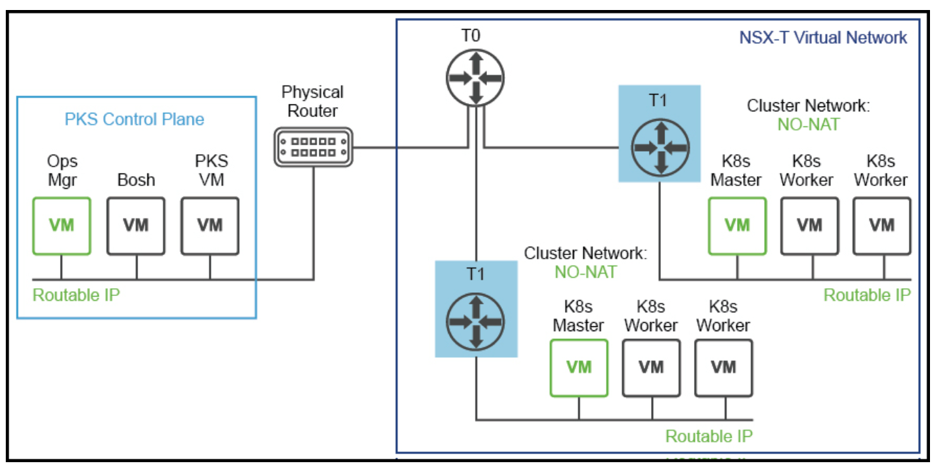
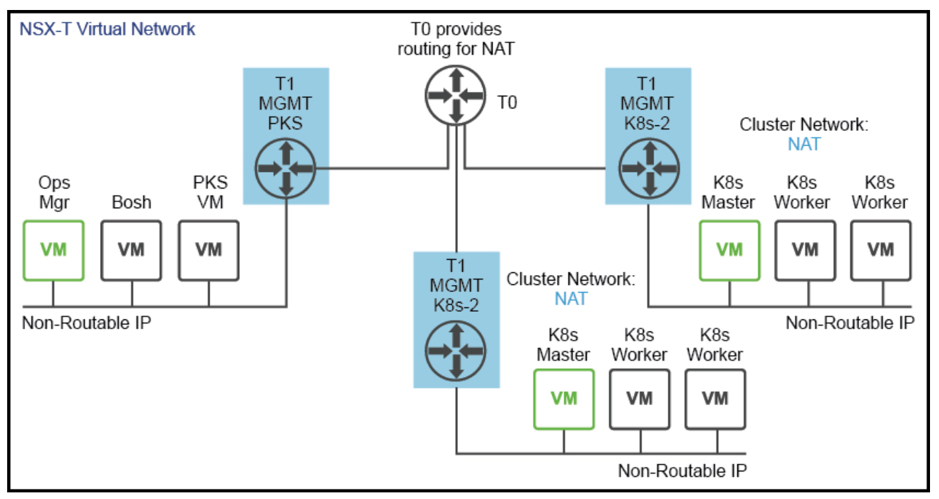
In case they are connected to a VDS dPG, then we cannot apply NAT to K8s-Nodes IP addresses to avoid breaking the connectivity between the Kubernetes Clusters Nodes VMs and Enterprise PKS management. This is called No-NAT Topology.

No-NAT Topology


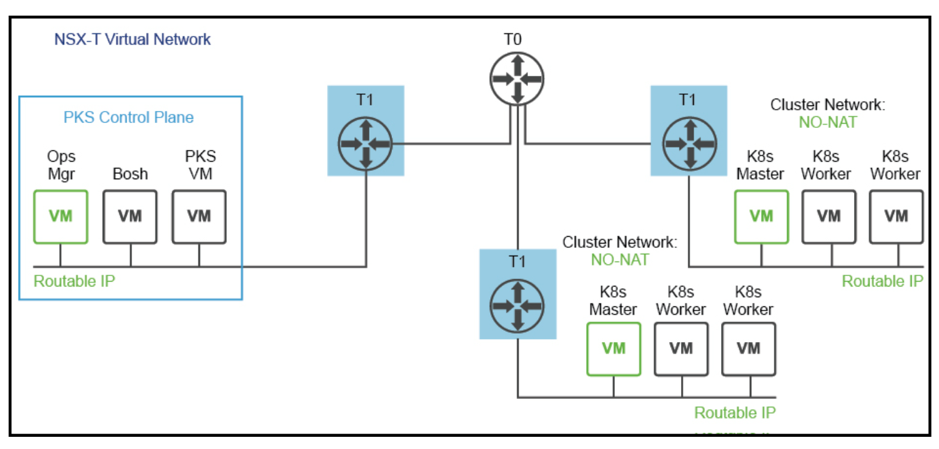
If PKS management VMs are connected to an NSX-T Logical switch, then we have the choice to NAT or No-NAT K8s-Nodes IP addresses to save on routable IP addresses. This is called NAT Topology or No-NAT with NSX-T.

  Direct Routing for Kubernetes Nodes

NAT Kubernetes Nodes

NAT or No-NAT mode could be configured during Enterprise PKS Installation

More info on PKS design could be found here.

Preparing NSX-T for Kubernetes (non-PKS)

Enterprise PKS automates the creation and configuration of NSX Container Plugin (NCP) and other NSX related components. Those steps will need to be done manually in non-PKS environments. We will need to perform similar steps as we did in Enterprise PKS. The only difference is that we don’t need a K8s-Nodes-Block since we are talking about a single Kubernetes Cluster. On top of that we need to install OVS, NSX Node Agent, and NCP. More details could be found here.

VMware Enterprise PKS Network Profiles

This section describes how to use network profiles when creating a Kubernetes cluster with VMware Enterprise PKS on vSphere with NSX-T. Network profiles will allow customizing NSX-T configuration parameters while creating the Kubernetes Cluster.

Network Profiles are optional in Enterprise PKS, they allow the administrator to customize the networking setting for a Kubernetes cluster instead of using the default values configured during Enterprise PKS initial installation.

To assign a Network Profile, three steps are required:

  1. Define a Network Profile JSON File
  2. Create a Network Profile using the JSON File.
  3. Create a Kubernetes Cluster with the created Network Profile.

Define a Network Profile JSON File

The following parameters could be defined on the Network Profile as of Enterprise PKS 1.4:

  • Load Balancer Sizing
  • Customer Pod Networks
  • Routable Pod Networks
  • Bootstrap Security Groups for Kubernetes Master Nodes
  • Pod Subnet Prefix
  • Custom Floating IP Pool
  • DNS Configuration for Kubernetes Cluster
  • T0-Router selection


JSON file Sample below

k8s-dev-cluster-np.json

{

    "name": "k8s-dev-cluster-np",

    "description": "Network Profile for K8s Dev Cluster",

    "parameters": {

        "lb_size": "medium",

        "t0_router_id": " c76ce484-c55e-4ec9-9bab-d0199ae298fd",

        "fip_pool_ids": [

            "e50e8f6e-1a7a-45dc-ad49-3a607baa7fa2"

        ],

        "pod_routable": true,

        "pod_ip_block_ids": [

            "ebe78a74-a5d5-4dde-ba76-9cf4067eee55",

            "ebe78a74-a5d5-4dde-ba76-9cf4067eee56"

        ]

        "master_vms_nsgroup_id": "9b8d535a-d3b6-4735-9fd0-56305c4a5292",

        "pod_subnet_prefix" : 26

    }

}

For the Parameters section, one or more parameters could be configured as needed.

You can notice in above profile that the Load Balancer size is Medium. If we have not defined a size, the default size, which is Small, will be used. Here you can see a sample of NSX-T Load Balancer sizes in NSX-T 2.4 (scalability may change based on the release)


Load Balancer Service Small Medium Large
Number of virtual servers per load balancer 20 100 1000
Number of pools per load balancer 60 300 3000
Number of pool members per load balancer 300 2000 7500


Note the choice of the T0-Router

Using Network Profiles, a separate T0-Router could be used for that cluster which will allow for Network segregation on the Physical Network Level. The T0-Router UUID could be captured from the NSX-T Manager GUI. If we have not configured a Network Profile, then that Kubernetes Cluster will be attached to the default T0-Router configured during Enterprise PKS Installation. Same goes for other parameters, default configuration from the PKS Installation could be overwritten using Network Profiles.

Another important configuration to notice:

“pod_routable": true

Above input will instruct NSX to assign a routable subnet to the pods from the pod_ip_block_ids. The default would be to use NAT from the default IP Block configured during PKS Installation on the PKS Tile in the Operations Manager.

More info on the JSON file template could be found here.

Now we created the JSON file, let’s move forward and create the Network profile.

Create a Network Profile

To create a network profile, a single PKS command will be used pointing the JSON file created in the previous step. Let us take a look at all Enterprise PKS commands using pks –-help list all PKS commands (Enterprise PKS 1.4).

localadmin@pks-client:~$ pks --help


The Pivotal Container Service (PKS) CLI is used to create, manage, and delete Kubernetes clusters. To deploy workloads to a Kubernetes cluster created using the PKS CLI, use the Kubernetes CLI, kubectl.


Version: 1.4.0-build.194


Usage:

  pks [command]


Available Commands:

  cluster                View the details of the cluster

  clusters               Show all clusters created with PKS

  create-cluster         Creates a kubernetes cluster, requires cluster name, an external host name, and plan

  create-network-profile Create a network profile

  create-sink            Creates a sink for sending all log data to syslog://

  delete-cluster         Deletes a kubernetes cluster, requires cluster name

  delete-network-profile Delete a network profile

  delete-sink            Deletes a sink from the given cluster

  get-credentials        Allows you to connect to a cluster and use kubectl

  get-kubeconfig         Allows you to get kubeconfig for your username

  help                   Help about any command

  login                  Log in to PKS

  logout                 Log out of PKS

  network-profile        View a network profile

  network-profiles       Show all network profiles created with PKS

  plans                  View the preconfigured plans available

  resize                 Changes the number of worker nodes for a cluster

  sinks                  List sinks for the given cluster

  update-cluster         Updates the configuration of a specific kubernetes cluster


Flags:

  -h, --help      help for pks

      --version   version for pks


Use "pks [command] --help" for more information about a command.


We will use the below command to create the Network Profile.

localadmin@pks-client:~$ pks create-network-profile k8s-dev-cluster.json

Network profile k8s-dev-cluster successfully created

Created Network Profiles could be listed using the below command.

localadmin@pks-client:~$ pks network-profiles

Name               Description

k8s-dev-cluster    Network Profile for K8s Dev Cluster

Now that we have our Network Profile, let’s create a Kubernetes cluster.


Create a Kubernetes Cluster with Enterprise PKS Network Profile

To create a Kubernetes Cluster in Enterprise PKS with a network profile, run the following command:

$ pks create-cluster CLUSTER-NAME --external-hostname HOSTNAME --plan PLAN-NAME --network-profile NETWORK-PROFILE-NAME

Example:

$ pks create-cluster k8s-dev-cluster --external-hostname k8s-dev-cluster.vmware.com --plan small --network-profile k8s-dev-cluster-np

Note: “plan” is the Kubernetes cluster size which is configured in PKS tile in Ops-Manager during PKS Installation.

When we create the cluster, NSX-T will react based on the Network Profile config. Independently if there is a Network Profile or not, NSX-T will create six T1-Routers, one for the K8s-Nodes VMs (cluster-router) and four for the default Names Spaces (default, kube-public, kube-system, pks-system) and one for Load Balancing.

All the objects related to a cluster, will include the UUID of the cluster in their names. In our example the UUID of the cluster is 8b7553e8-fbca-4b75-99ba-8f41eb411024

It can be found using below pks command:

$ pks clusters

Name            Plan Name   UUID                                  Status    Action

demo-cluster-01  medium     8b7553e8-fbca-4b75-99ba-8f41eb411024  succeeded CREATE

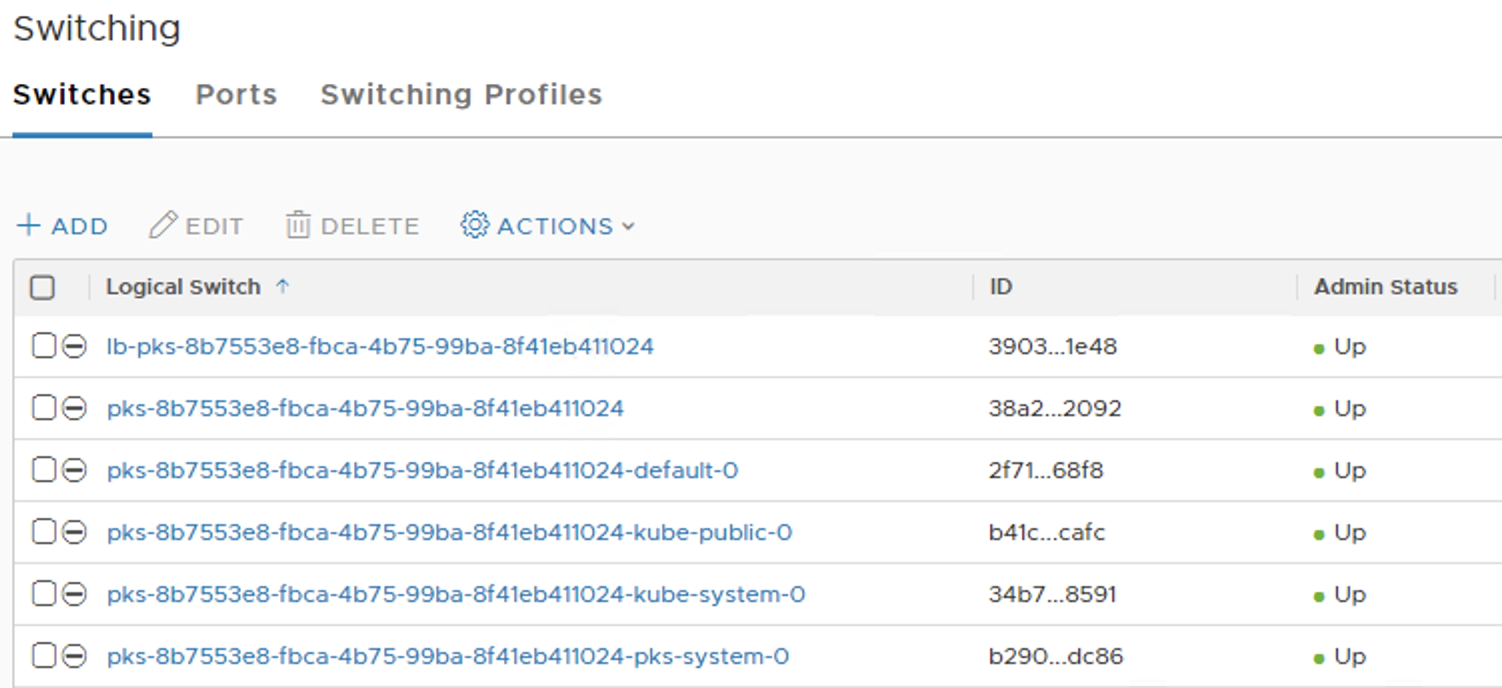
We can see that six T1-Routers are created in NSX-T:

Six Logical Switches are created in NSX-T Logical Switches section:

Two Load Balancer VIPs created are used for Kubernetes Ingress. One for HTTP and another one for HTTPs.

Note: in a Kubernetes environments other than Enterprise PKS, NCP could create a load balancer or utilize an existing one based on what is configured in the NCP.ini in below field.

lb_service = <name_or_uuid>


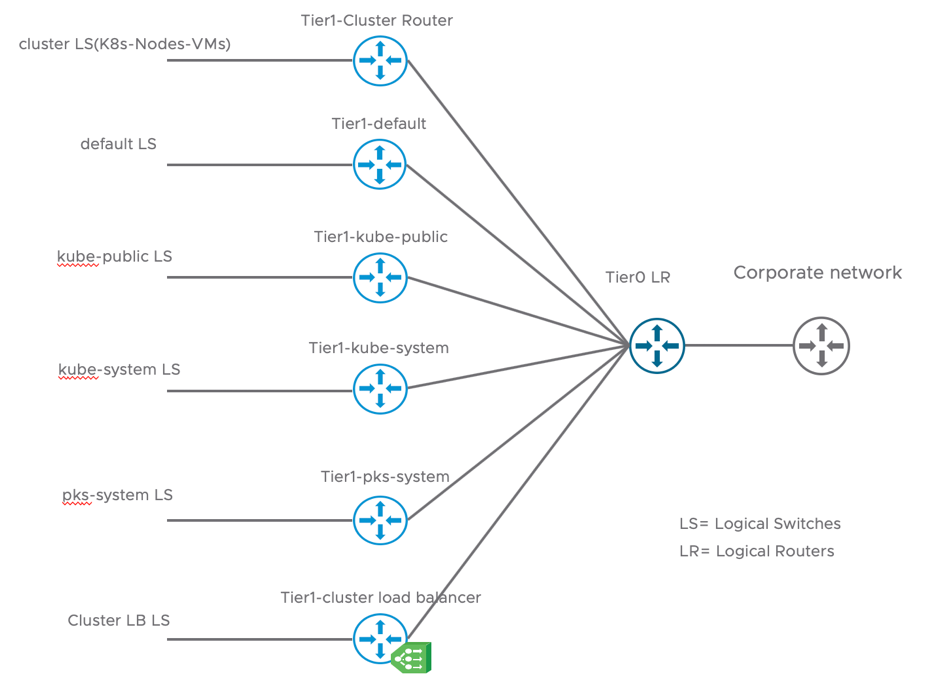
Here is a logical diagram for created Logical Routers and Switches to make it more clear:


Each Logical Switch will have a Tier1 Logical Router as a Default Gateway. For the Tier1-Cluster Router, the first available subnet from Nodes-IP-Block will be used with the first IP address as the Default Gateway.

  • For all Kubernetes Name Spaces, a subnet will be derived from the Pods-IP-Block
  • For the Load Balancer VIP, An IP Address will be used from the IP-Pool-VIPs

A SNAT entry will be configured in the Tier0 Logical Router for each Name Space using the IP-Pool-VIPs since it is the Routable one in the enterprise network.

A Load Balancer VIP will be placed on front of the Kubernetes Master VM(s). That VIP IP is taken from the IP-Pool-VIPs. This IP address is extremely important since it is going to be the main IP to access the Kubernetes Cluster. A DNS entry needs be created to that IP address to access the Kubernetes Cluster. The external IP address for the cluster could be found in NSX-T manager GUI or from PKS CLI as shown below in red,

localadmin@pks-client:~$ pks cluster demo-cluster-01


Name:                     demo-cluster-01

Plan Name:                medium

UUID:                     8b7553e8-fbca-4b75-99ba-8f41eb411024

Last Action:              CREATE

Last Action State:        succeeded

Last Action Description:  Instance provisioning completed

Kubernetes Master Host:   demo-cluster-01.vmwdxb.com

Kubernetes Master Port:   8443

Worker Nodes:             2

Kubernetes Master IP(s):  172.17.1.17

In the above example, A DNS entry should be created to map demo-cluster-01.vmwdxb.com to 172.17.1.17 before accessing the cluster with “pks get-credentials” command.

NSX GUI:

Kubernetes Operations with NSX-T

This section is not only restricted to PKS, it could be applied to any Kubernetes Distribution.

Before I start with mapping Kubernetes Networking Objects to NSX-T Objects, here is an overview mapping of the Kubernetes Networking Objects to traditional Networking Objects that will help the networking admins have a better understanding. I’m probably oversimplifying it here, but it will help show what we are trying to achieve for the Networking Admin.

Kubernetes Object Traditional Networking terms Notes
Name Space Tenant Native K8s feature
Kubernetes Ingress North-South Layer 7 Load Balancer (HTTP-HTTPS) Needs and external Ingress Controller
Service Type Load Balancer North-South Layer 4 Load Balancer Needs a cloud provider’s load balancer to work
Service Type ClusterIP East-West Layer 4 Load Balancer Native K8s feature using KubeProxy
Service Type NodePort NAT Pod IP/Port to Node IP/Port Native K8s feature using KubeProxy
Kubernetes Network Policy Access Control List (ACL) Needs a CNI plugin that support Network Policy


In this section I want to describe how would NSX-T will react to Kubernetes operations. One of the main design principles in NSX-T CNI integration with Kubernetes is not to stand in the way of the developer by automating the creation of all needed Networking and Security constructs in NSX-T.

Let’s take a closer look at how NSX-T will react to different Kubernetes Operations related to Networking and Security.

Name Space Creation (NAT Mode)

Let’s create our first Kubernetes Name Space and see how NSX-T will react to that.

$ kubectl create ns yelb

namespace/yelb created

Now let’s take a look at NSX-T and do a simple search for any items with the name yelb

T1-Router is created for that Name Space:

Logical Switch Created for that Name Space:

The above Logical switch will be attached to the respective Logical Router. A subnet will be derived from the Pods-IP-Block with the first IP address assigned to the Router Port to act as a Default Gateway for the Pods in that Name Space.

A SNAT entry will be configured in the Tier0 Logical Router for each Name Space using the IP-Pool-VIPs since it is the pool with external connectivity.

 Name Space Creation (No-NAT Mode)

NSX-T has the ability to create a Name Space with direct routing to the Pods IP Addresses.

To do that, we need to add an annotation to the Name Space YAML file as shown below:

admin@k8s-master:~$ vim no-nat-namespace.yaml


apiVersion: v1

kind: Namespace

metadata:

   name: no-nat-namespace

   annotations:

      ncp/no_snat: "true“


admin@k8s-master:~$ kubectl apply -f no-nat-namespace.yaml

Note: even though NSX-T NCP always supported Routable Pods Network, this feature is only supported in PKS 1.3 and later. To configure Routable Pods Network in PKS, a Network Profile will need to be configured as shown in the below example:

np_customer_B.json

{

    "name": "np-cust-b",

    "description": "Network Profile for Customer B",

    "parameters": {

        "lb_size": "medium",

        "t0_router_id": "5a7a82b2-37e2-4d73-9cb1-97a8329e1a92",

        "fip_pool_ids": [

            "e50e8f6e-1a7a-45dc-ad49-3a607baa7fa2"

        ],

      "pod_routable": true,

      "pod_ip_block_ids": [

             "ebe78a74-a5d5-4dde-ba76-9cf4067eee55",

             "ebe78a74-a5d5-4dde-ba76-9cf4067eee56"

      ]

        "master_vms_nsgroup_id": "9b8d535a-d3b6-4735-9fd0-56305c4a5292",

        "pod_subnet_prefix" : 26

    }

}

In other Kubernetes environments, other than Enterprise PKS, the Routable IP block will be pointed to in the ncp.ini no_snat_ip_blocks =

NSX-T NCP Configuration could be found here.

Service Type Load Balancer

Kubernetes Service Type LoadBalancer will provision an external Layer-4 Load Balancer depending on the Cloud Provider. For example, using this feature in AWS will provision an ELB.

In NSX-T, the Load Balancer is already provisioned during the cluster creation. Deploying a service type LoadBalncer will configure the VIP, and the Servers Pool as per the specs specified on the YAML file. Let’s take a look at the below example.

apiVersion: v1    

kind: Service

metadata:

  name: yelb-ui

  labels:               

    app: yelb-ui

    tier: frontend

  namespace: yelb

spec:

  type: LoadBalancer

  ports:

  - port: 80             #<< VIP Port Number

    protocol: TCP             

    targetPort: 80        #<< Pool Port Number

  selector:

    app: yelb-ui         #<<Dynamic Membership for the Pool based on Labels

    tier: frontend

$ kubectl apply -f yelb-ui.yaml

$ kubectl get svc -n yelb

NAME         TYPE          CLUSTER-IP       EXTERNAL-IP            PORT(S)     AGE

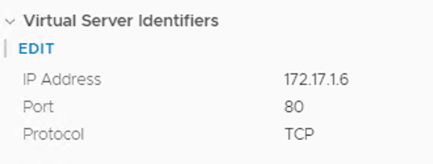
yelb-ui   LoadBalancer  10.100.200.205  100.64.128.33,172.17.1.6  80:32059/TCP  6d

The IP address 172.17.1.6 in above example, is the external VIP IP which was assigned from the IP-Pool-VIPs from NSX-T IPAM. We can access our application using this IP address.

If you are wondering what the other IP address is (100.64.128.33), it’s the internal IP of the Load Balancer Service. This IP could be used to be matched in a Kubernetes Network Policy.

In NSX-T, a new VIP is created with the External IP address as shown in kubectl get svc:

VIP Port Number as per the YAML file

A server pool is created,

There is a dynamic membership in the pool based on Kubernetes Labels specified in the YAML file. Let’s try to scale our deployment and see if NSX-T will pick that up in the LoadBalancer Pool

$  kubectl scale --replicas=3 deploy/yelb-ui


Let’s take a look to our Pool:

Perfect!

In this section we showed how to create an External L4 Load Balancer in Kubernetes and how the specs will be mapped in NSX-T.

Kubernetes Ingress

In most of Kubernetes deployments, Kubernetes Ingress will need an Ingress Controller such as Nginx Ingress Controller, HA Proxy or OpenShift Router. With NSX-T, Kubernetes Ingress is handled by the same Load Balancer used for Service Type LoadBalancer.

During the Kubernetes cluster creation, NSX-T created a load balancer with two VIPs: one for HTTP, and another one for HTTPS.


The External IP addresses was already assigned. Let’s see what will happen when we create a Kubernetes Ingress:

apiVersion: extensions/v1beta1

kind: Ingress

metadata:

  name: test-ingress

#if HTTPS termination is required, a Kubernetes Secret should be added

spec:                  

  rules:

#the host name or URL to access the application

  - host: rest-review.vmwdxb.com  

#only HTTP is supported in the server pool side with NSX-T as of today.                                                                   

    http:  

#we can use different paths to access different Kubernetes services                                 

      paths:

      - path:   

#a service to group the pods that we need to access

        backend:

          serviceName: yelb-ui    

          servicePort: 80


Note: for HTTPS termination, a Kubernetes Secret should be added under the (spec:) as below example

spec:

  tls:

  - hosts:

    - rest-review.vmwdxb.com

    secretName: testsecret-tls

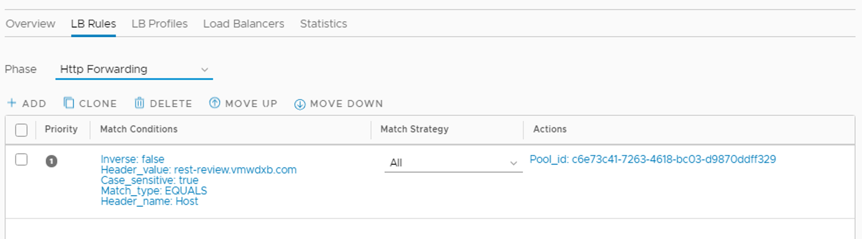
If we take a look at NSX-T, we should find a new HTTP forwarding rule based on the path specified in the YAML in the HTTP/HTTPS VIP that was created during the cluster creation. In the case of HTTPS, NSX-T will use the Kubernetes Secret for the HTTPS termination.


Kubernetes Network Policy

Kubernetes Networks Policy requires a CNI plugin to enforce the policy. In this section I will explore how NSX-T will react when a Kubernetes Network Policy is configured, but before that I need to clarify something very important in Network Security Operations in Kuberentes environments with NSX-T.

There are two ways to restrict the access to Kubernetes pods with NSX-T

  • Kubernetes Network Policy: the definition of Kubernetes Network Policy is done by the DevOps admin which is sometimes called SRE or PRE. NSX-T will automatically create the Security Group and enforce the policy based on the Kubernetes Network Policy YAML definition.
  • Predefined Label Based Rules: typically the Security Group and Policy will be created by the Security Admin from NSX-T with a membership criteria that is based on Kubernetes Objects and labels.


Which one should you use?

The answer to that question depends on the Operations model in the organization. My recommendation is to use a mix of both. The good thing in NSX-T is that all rules will be visible in a centralized place in NSX-T manager Firewall Dashboard regardless of what methodology is used to create them.

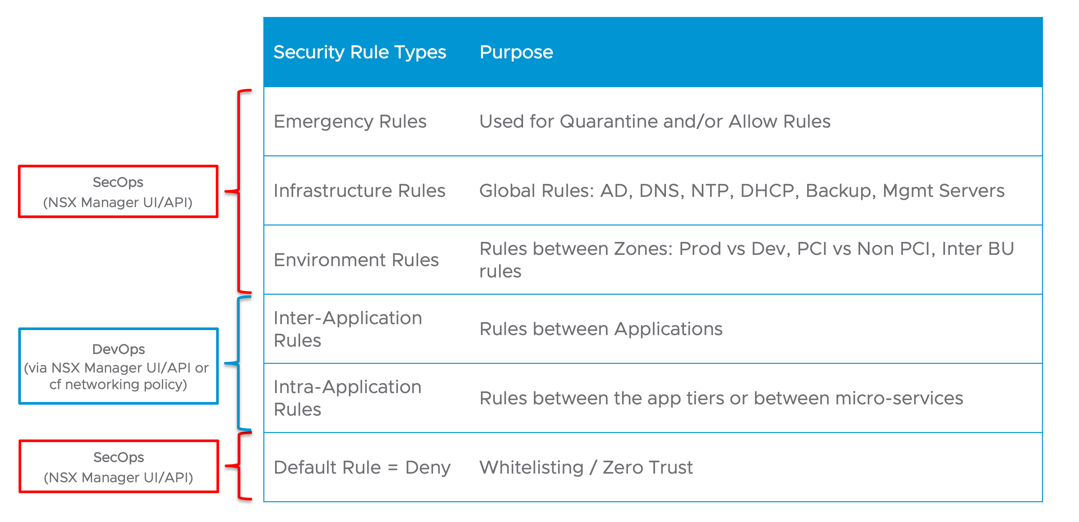
In NSX-T Distributed Firewall we support the concept of Firewall Sections, higher Sections are higher priority than lower ones and will be applied first. Predefined Security Rules could be created by the security admin in highest and lowest sections to create rules related to infrastructure services such DNS, LDAP, NTP and rules between different Kubernetes Clusters and Name Spaces. The Lowest Section will include the default deny rule.

The Middle Section could be handled by the DevOps team within a cluster or a Name Space to give them the ability to test their applications without the need to go back to the SecOps.

So let’s go back to Kubernetes Network Policy. Here is a simple example of Kubernetes Network Policy:

apiVersion: networking.k8s.io/v1

kind: NetworkPolicy

metadata:

  name: test-network-policy

  namespace: default

spec:

  podSelector:

    matchLabels:

      app: yelb-appserver                 #<< Selector for Destination Pods

  policyTypes:

  - Ingress.                              #<< it could be Ingress, Egress or both

  ingress:

  - from:

    - podSelector:

        matchLabels:

          app: yelb-ui.                   #<< Selector for Source

    ports:

    - protocol: TCP                      #<< Port Number to Open

      port: 4567

Here’s more info about Kubernetes Network Policy.

Now let’s have a look how NSX will react to the above Kubernetes Network Policy by checking NSX-T Distributed Firewall.

As you can see below, the Source, Destination and port numbers are automatically created in NSX-T:

You can see that automatic groups created for the Network Policy, one for the Source which starts with src- and another one for target starts with tgt- with TCP 4567 allowed.

Assigning a Static IP Address to a Kubernetes Service

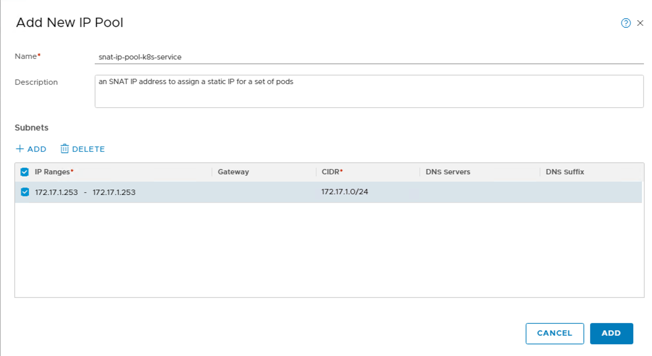
With NSX-T, we can assign a set of Kubernetes Pods a specific IP Address or a group of SNAT IP Addresses to source their traffic from.

This IP or group of IPs will override the Name Space SNAT IP address. The benefit of that is a predictable IP for a Pod or group of Pods to make it easily identifiable in the physical infrastructure. That will help in case we want to use existing physical firewalls or any other physical devices.

The first thing we need to do is define a new IP-Pool in NSX-T. That Pool could have a single IP address or a group of IP address. In this example I am using a single IP.


The only thing we need to do is add an annotation  “ncp/snat_pool: SNAT-IP-POOL-NAME” to any Kubernetes service as below:

apiVersion: v1                                                                                                                                                                                                
kind: Service                                                                                                                                                                                                 
metadata:                                                                                                                                                                                                     
  name: svc-example                                                                                                                                                                                           
  annotations:                                                                                                                                                                                                
    ncp/snat_pool: snat-ip-pool-k8s-service
  selector:                                                                                                                                                                                                   
    app: example

Don’t forget to apply the YAML file 🙂

Troubleshooting

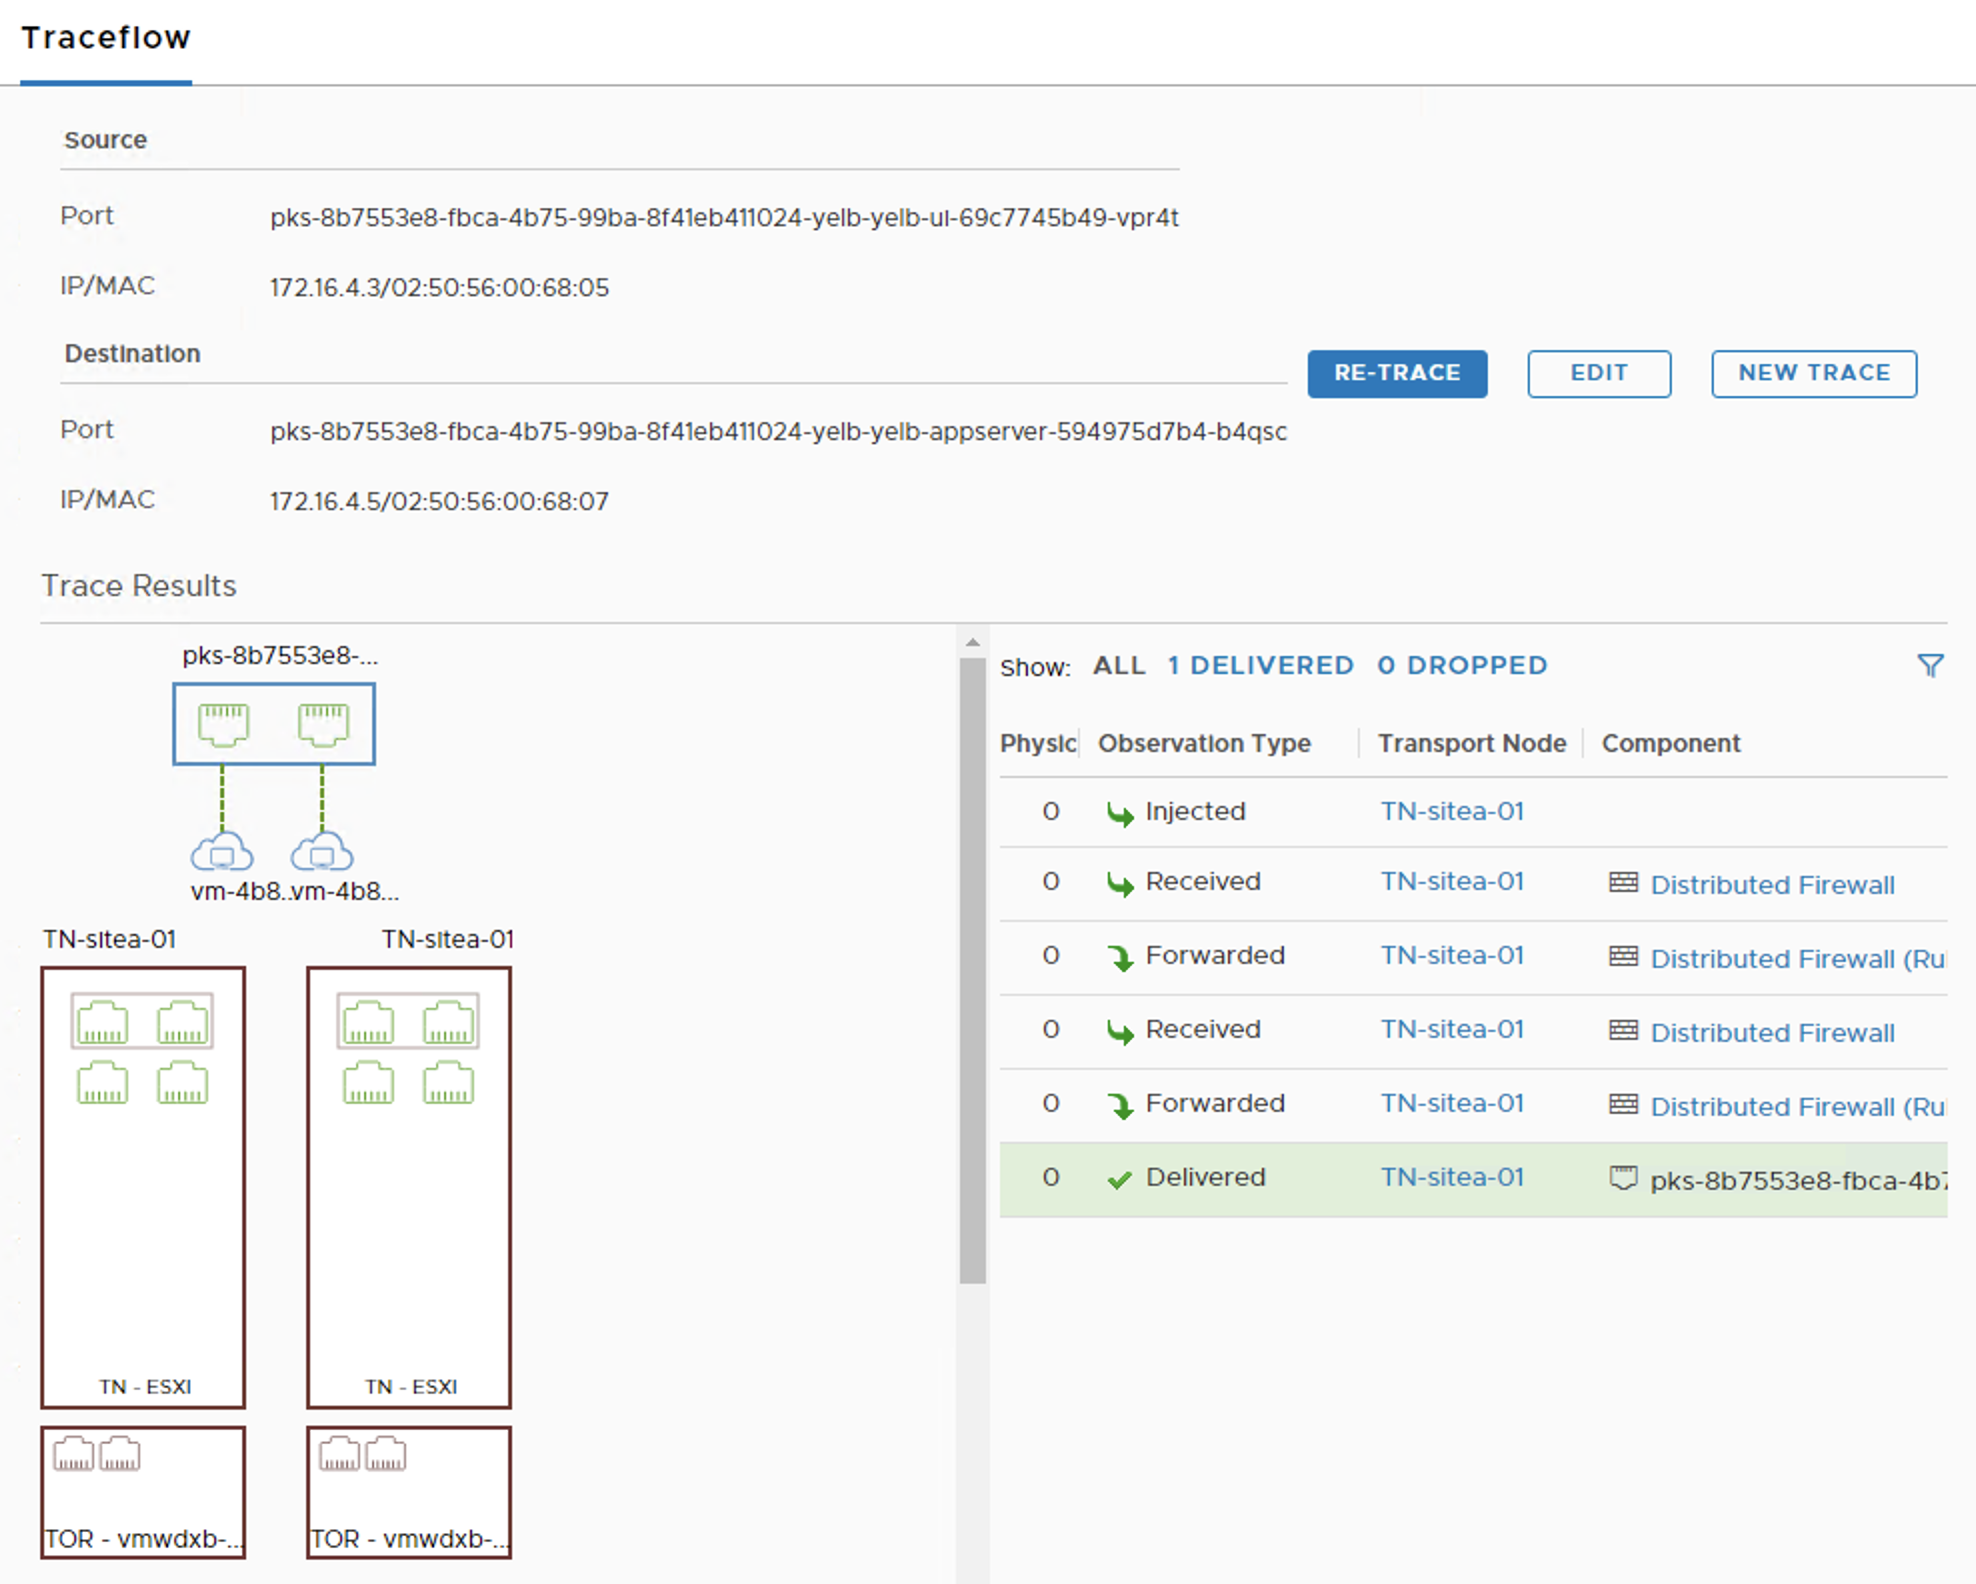
The easiest way to troubleshoot connectivity between Pods or between Pods & VMs is to use NSX-T Traceflow. Traceflow could emulate any kind of traffic and it will show what is blocking it in case a Firewall Rule or a Kubernetes Network Policy is blocking that traffic.

With NSX-T we could see Pods IP addresses, LB-Pools Health, Port counters etc. all from NSX-T GUI in a way that is friendly to the Operations Team.

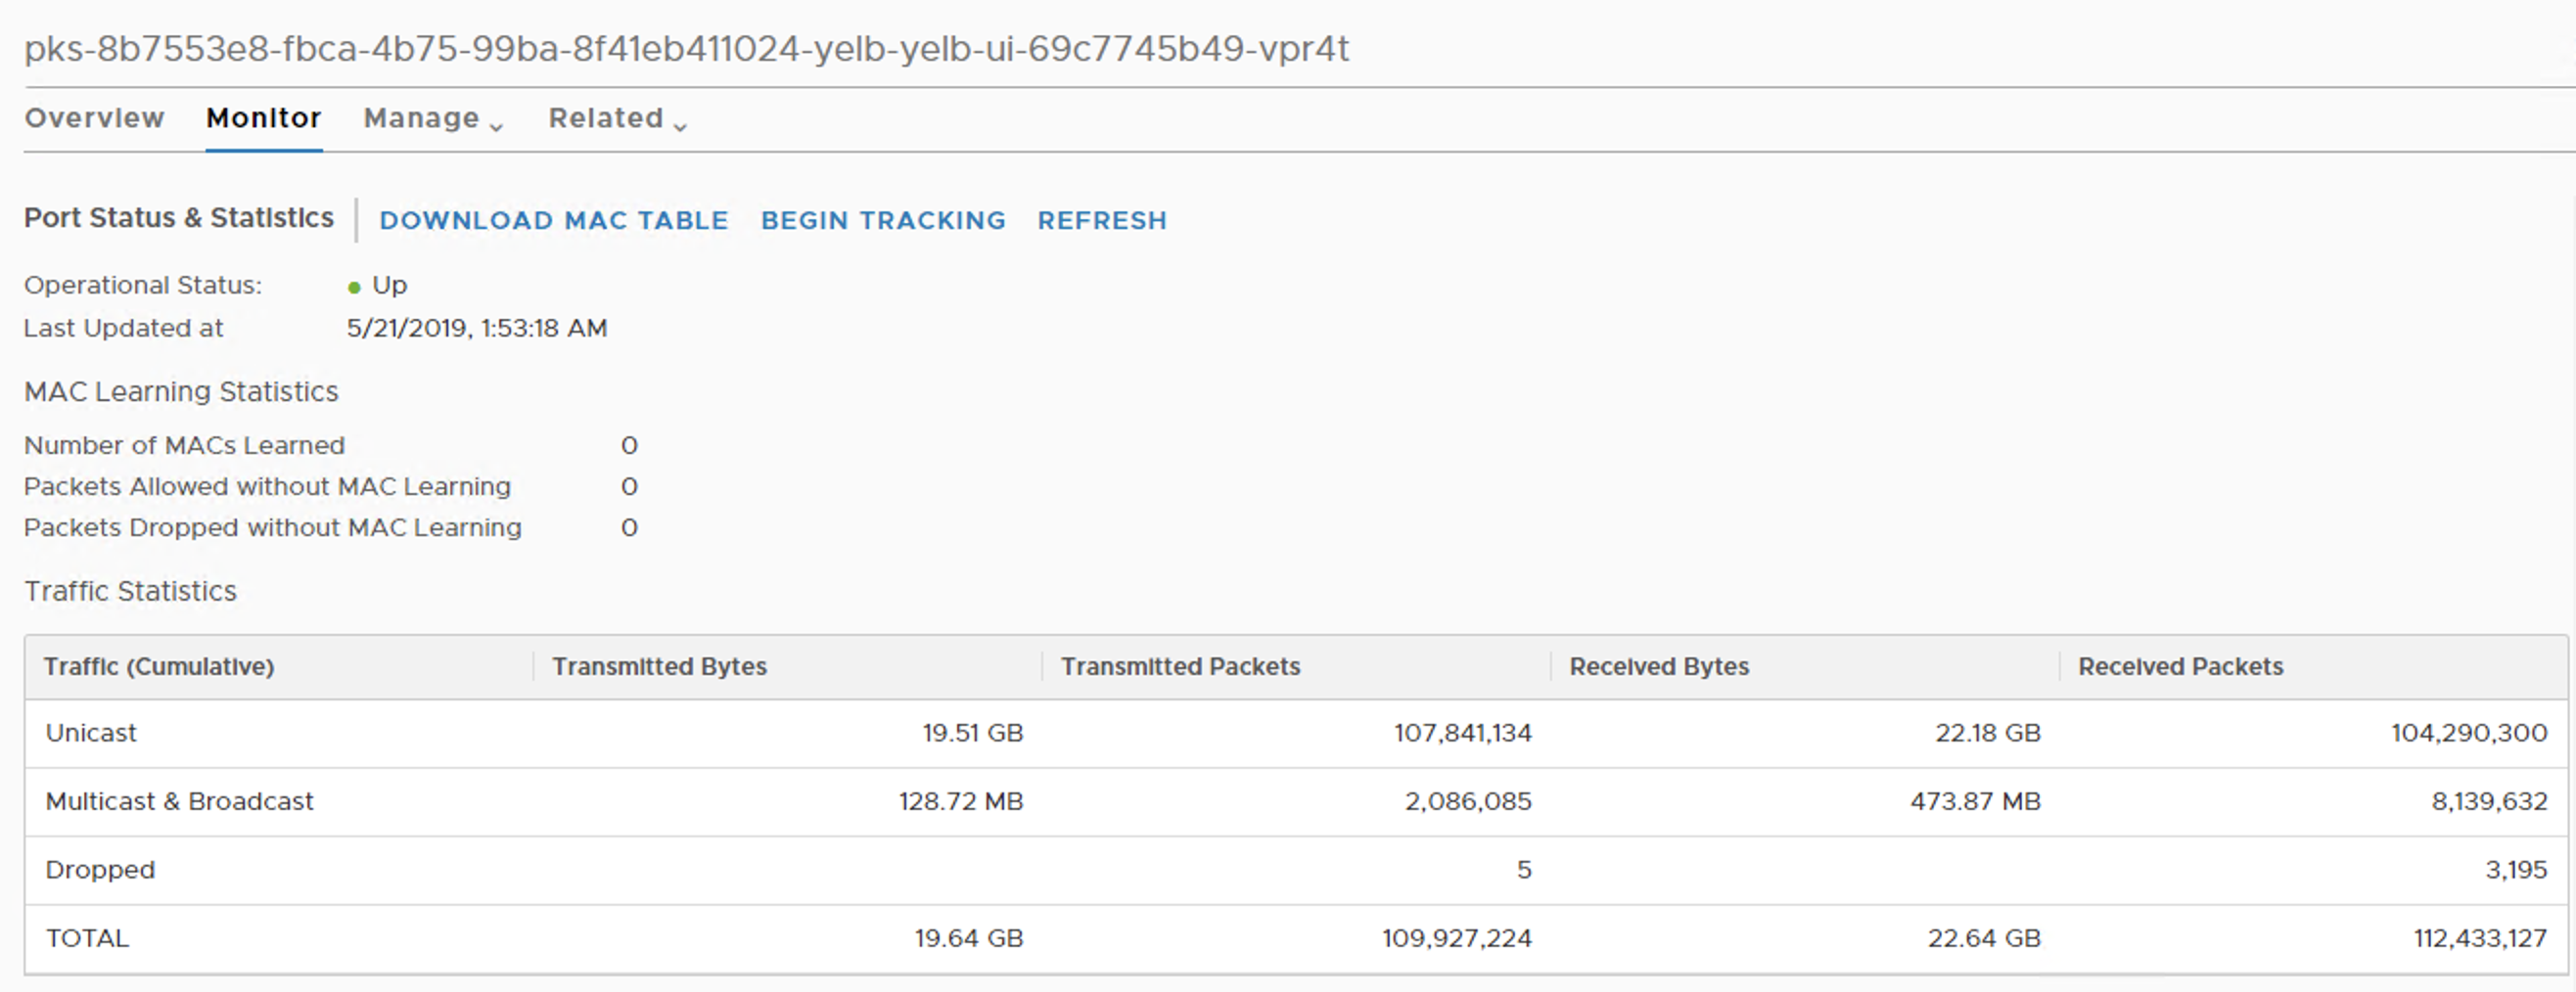
Below is a capture of the Logical Port view that a Kubernetes Pod is connected to where some stats could be seen related to sent and received traffic to that Pod.

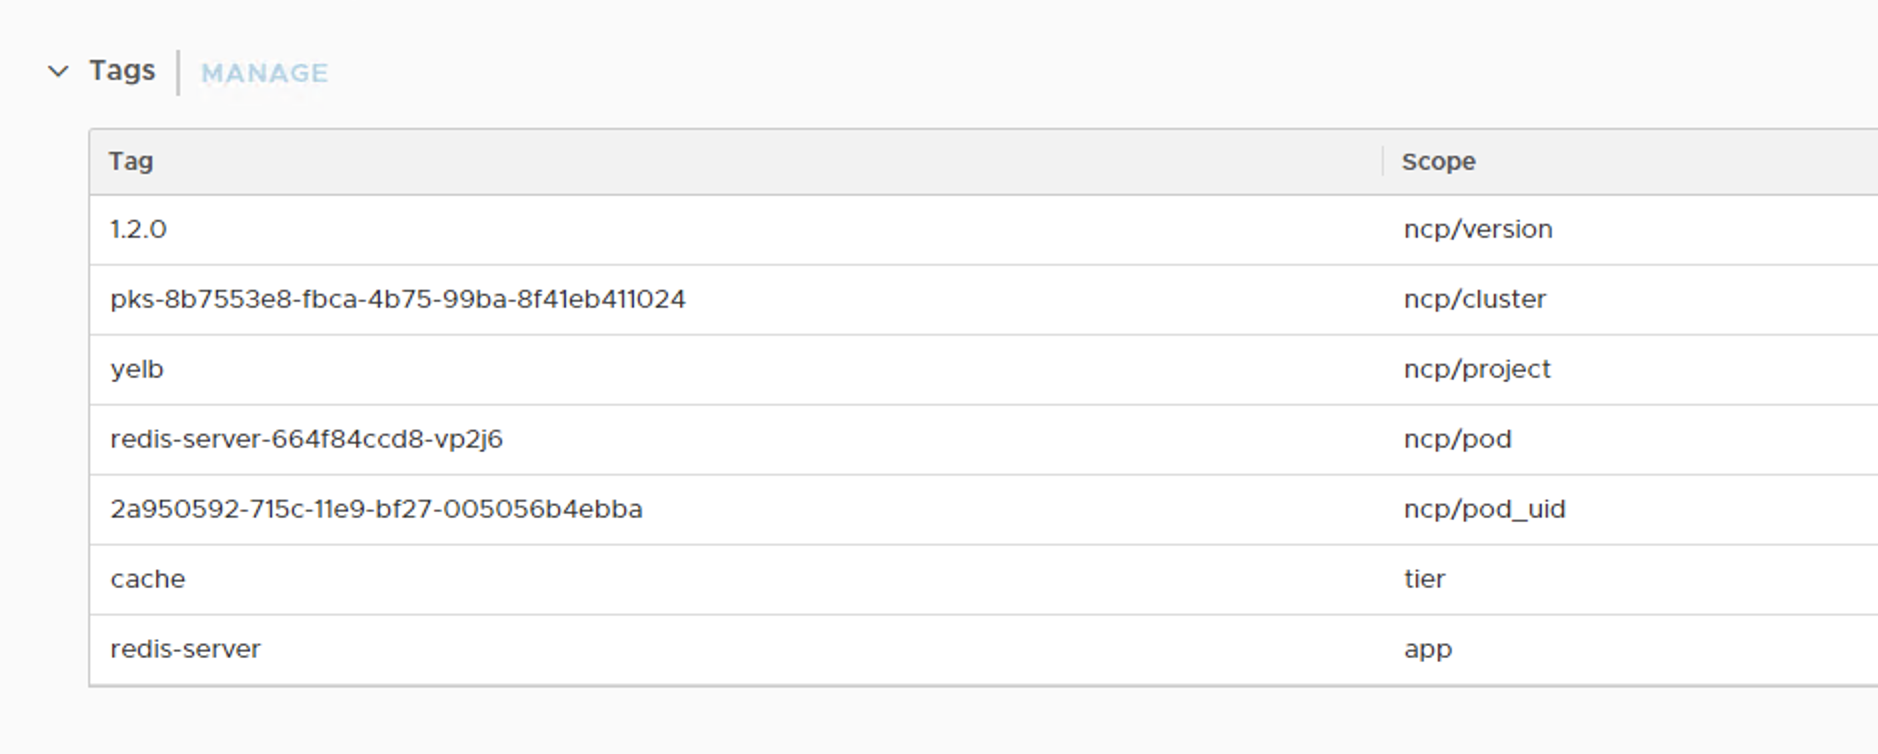
Another important point to notice is “the Tags”. By checking the Logical Port Tags, we could find a lot of useful info such as the Pod Name, Name Space (Project), and all other Kubernetes Tags as shown below for a Redis Pod,

For more visibility, vRealize Network Insight Could be used. Starting vRNI 4.1, we could use it for monitoring and getting visibility in Kubernetes and Enterprise PKS environments. more info could be found in this blog.

Summary

In this blog I focused on how to operate NSX-T in Kubernetes environments.

  • I started with an NSX-T Deployment and Integration with Kubernetes and Enterprise PKS overview
  • How to use Enterprise PKS Network Profiles
  • How Kubernetes Objects are mapped to NSX-T Objects.

As you could see in this blog, NSX-T does not stand in the way of the developer and provide the operations team the security and visibility they need to operate the environment.

Getting started? Test drive for free:

The post Kubernetes and VMware Enterprise PKS Networking & Security Operations with NSX-T Data Center appeared first on Network Virtualization.

VMware Announces Intent to Acquire Avi Networks to Deliver Software-Defined ADC for the Multi-Cloud Era

$
0
0

By Tom Gillis, SVP/GM of Networking and Security BU

Today I’m excited to announce that VMware has signed a definitive agreement to acquire Avi Networks, a leader of software-defined application delivery services for the multicloud era.

Our vision at VMware is to deliver the “public cloud experience” to developers regardless of what underlying infrastructure they are running. What does this mean? Agility. The ability to quickly deploy new workloads, to try new ideas, and to iterate. Modern infrastructure needs to provide this agility wherever it executes – on premises, in hybrid cloud deployments, or in native public clouds, using VM’s, containers or a combination of the two. VMware is uniquely suited to deliver this, with a complete set of software-defined infrastructure that runs on every cloud, even yours.

Application Delivery Controllers (ADCs) are a critical pillar of a software-defined data center. Many workloads cannot be deployed without one. For many customers, this means writing their application to bespoke and proprietary APIs that are tied to expensive hardware appliances. The Avi Networks team saw this problem and solved it in the right way. They built a software architecture that is truly scale-out, with a centralized controller. This controller manages not just the configuration of the individual load balancers, but also manages their state. This architecture mirrors the approach of our groundbreaking software-defined networking solution VMware NSX. For this reason, we are very excited that the Avi team will join forces with the NSX team after the deal closes to completely redefine how networking infrastructure is designed and deployed.

Founded in 2012, Avi Networks pioneered a software-defined ADC architecture that is fully distributed, auto scalable, and intrinsically more secure, with real-time analytics for modern applications running in VMs, containers, or bare metal across data centers and clouds. The Avi Platform enables elastic load balancing, application acceleration, and security services combined with centralized management and orchestration for consistent policies and operations.

Unlike traditional ADCs, Avi Networks does not require custom appliances and can be consumed on-prem, in public clouds, or as a service, enabling new flexibility and faster time to value at lower costs. Built on REST APIs and plugins, the Avi Platform is fully automated and can be easily integrated with CI/CD pipelines for application delivery. With support for multiple clouds and platforms such as AWS, Azure, GCP, OpenStack, and VMware, Avi has been adopted by many enterprises around the world including Deutsche Bank, AdobeSwisslosEBSCOZOLL Data, Telegraph Media Group, and University of Leipzig among others.

Upon close, the VMware and Avi Networks teams will work together to advance our Virtual Cloud Network vision, build out our full stack L2-7 services, and deliver the public cloud experience for on-prem environments. We plan to introduce the Avi platform to our customers and partners to help enterprises adopt software-defined application delivery across data centers and clouds and continue our work with technology partners for interoperability.

On behalf of VMware and the Networking and Security Business Unit, I look forward to welcoming the Avi Networks team onboard and meeting our joint customers and partners.

For additional perspective, please read Shekar Ayyar’s blog.

Tom


The post VMware Announces Intent to Acquire Avi Networks to Deliver Software-Defined ADC for the Multi-Cloud Era appeared first on Network Virtualization.

Financial Services Company Becomes More Secure and Agile

$
0
0

Flexible IT Infrastructure Required for Operation

Being #1 has its own kind of pressure. When you’re #2 in the market you have a clear goal: topple the #1. What’s the mindset of a market leader? Watch your back? Protect what you have? Ignore everything?

Harel lnsurance lnvestments & Financial Services is the leader of Israel’s insurance market. It has four big rivals competing for its business and must be conscious of outside disruptors turning the market on its head. An understandable strategy might be for Harel to sit tight and protect what it has.

Instead, Harel wants to transform its entire approach. It doesn’t just want to be big, it wants to be fast. It wants to succeed by being the first to launch new services, by exploring new forms of customer engagement, by being innovative.

Harel, formed through a series of mergers and acquisitions, wants to:

  • Create an efficient, flexible IT infrastructure to support its entire operation
  • Automate human process, shifting IT’s focus from maintenance to new service development
  • Remove barriers to storage, performance and network, allowing developers to be faster to market with new services

IT will become the ‘silent leader’ of change throughout the business, proactively steering future strategy.

VMware Technology Secures Network

By deploying VMware NSX® Data Center and VMware vRealize® Network Insight™ Harel is now better able to segment its network virtualization. The former delivers networking and security entirely in software, abstracted from the underlying physical infrastructure; the latter accelerates micro-segmentation deployment, minimizes business risk during application migration and enables Harel to confidently manage and scale its NSX Data Center deployment.

IT Moving at the Speed of Business

As a result of securing VMware technology, Harel has become more secure, more efficient and more agile. There is greater automation, and a clearer audit trail of what piece of infrastructure is responsible for what service. Ultimately Harel is faster to market with new insurance services, and dynamic in the way it engages customers.

For instance, Harel now enables customers to buy short term car insurance via a link in a WhatsApp chat, one of the first times an insurance provider has used the new WhatsApp Business API. It is not a massive revenue generator but indicates Harel’s willingness to explore new channels to reach new customer segments.

It also sends a strong message to its rivals: don’t expect Harel to act defensively, Harel will pursue innovation.

In the confident words of Amir Levy, Senior Vice President for Infrastructure, Technology, and Cyber Security at Harel Insurance

“Innovation can cost time and money, but the outcomes can be fantastic. We don’t see new ventures not succeeding as failure. Perhaps it’s not the outcome we wanted, but we’ll benefit from the knowledge and experience.”

Learn More

The post Financial Services Company Becomes More Secure and Agile appeared first on Network Virtualization.

Light Board Video Series: VMware NSX Cloud

$
0
0

Over the last decade there has been a gradual, continuous shift of enterprise software applications away from the data center and towards one or multiple public clouds. As more and more applications are built natively in public clouds like AWS or Azure, the management of networking and security for those workloads becomes more complex: each cloud has its own set of unique constructs that must be managed independently of those in the data center.

What if there was a way to unify all of those workloads under one consistent networking fabric that can manage one standard set of networking and security policies across both on-premises and public clouds? This is where VMware NSX Cloud comes in.

What is NSX Cloud?

Designed specifically for public-cloud-native workloads, NSX Cloud extends VMware NSX software-defined networking and security from the data center to multiple public clouds, enabling consistent policy management from a single NSX interface.

To explain what NSX Cloud is and how it can deliver consistent hybrid networking and security for you, we asked our product manager Shiva Somasundaram to recored a three-part lightboard video series.

Part 1: NSX Cloud Overview

Shiva gives a high-level overview of what NSX Cloud is and how it delivers business value.

Part 2: NSX Cloud for Consistent Security

We’ll get a deep dive of NSX Cloud security. See how NSX delivers the same enterprise-grade security to cloud-native workloads that it delivers on-premises.

Part 3: NSX Cloud for Consistent Networking and Operations

Shiva explains how NSX Cloud delivers a continuous, consistent network across the entire hybrid cloud environment, giving the same level of control and visibility in the public cloud that you get on-premises.

NSX Hybrid Cloud Networking and Security Resources

Once you’ve had a chance to watch all three Light Board videos, there are several great ways to continue learning about hybrid cloud networking and security.

The post Light Board Video Series: VMware NSX Cloud appeared first on Network Virtualization.

Avi Networks Now Part of VMware

$
0
0

By Tom Gillis, SVP/GM of Networking and Security BU

When we first announced our intent to acquire Avi Networks, the excitement within our customer base, with industry watchers and within our own business was overwhelming. IDC analysts wrote, “In announcing its intent to acquire software ADC vendor Avi Networks, VMware both enters the ADC market and transforms its NSX datacenter and multicloud network-virtualization overlay (NVO) into a Layer 2-7 full-stack SDN fabric (1).

Avi possesses exceptional alignment with VMware’s view of where the network is going, and how data centers must evolve to operate like public clouds to help organizations reach their full digital potential. It’s for these reasons that I am happy to announce VMware has closed the acquisition of Avi Networks and they are now officially part of the VMware family going forward.

I’ve heard Pat Gelsinger say many times that VMware wants to aggressively “automate everything.” With Avi, we’re one step closer to meeting this objective. The VMware and Avi Networks teams will work together to advance our Virtual Cloud Network vision, build out our full stack L2-7 services, and deliver the public cloud experience for on-prem environments. We will introduce the Avi platform to our customers and partners to help enterprises adopt software-defined application delivery across data centers and clouds and continue our work with technology partners for interoperability.

Applications are the heartbeat of the modern enterprise. Enterprises need to deliver and update applications faster and more consistently across multi-cloud environments. To be successful, IT needs to automate everything, most importantly networking and security services across private and public clouds, to enable self-service for developers and gain the agility the business needs. Beyond just automated provisioning, IT needs comprehensive visibility into the end-user experience and end-to-end application performance.

With Avi Networks now part of VMware, we can deliver the industry’s only complete software-defined networking stack from L2-L7 built for the modern multi-cloud era leveraging a common architectural foundation. VMware will be able to offer both built-in load balancing capabilities as part of VMware NSX, and an advanced, standalone ADC offering that includes global server load balancing, web application firewall (WAF) and advanced analytics and monitoring.

To the team at Avi that has brought the company to this point, developing an incredible product set and exceptional company culture, we congratulate you and welcome you to VMware.

Tom


Source: IDC, June 2019, “VMware’s Acquisition of Avi Networks takes NSX to Application Layer, Strengthens VMWare’s Network Portfolio for Modern Apps, Multicloud”

The post Avi Networks Now Part of VMware appeared first on Network Virtualization.


Service-defined Firewall Benchmark and Solution Architecture

$
0
0

Today we are happy to introduce the Service-defined Firewall Validation Benchmark report and Solution Architecture document. Firewalls and firewalling technology have come a very long way in thirty years. To understand how VMware is addressing the demands of modern application frameworks, while addressing top concerns for present day CISO’s, let’s take a brief look at the history of this technology.


A Brief Firewall History

Over time, the network firewall has grown up, from initially being very basic to more advanced with the inclusion of additional features and functionality. The network firewall incrementally incorporated increasingly complex functionality to address many threats in the modern security landscape.

While the network firewall initially progressed rapidly to keep pace with the development of network technology and rapid evolution of network threat vectors, over the past decade there has been very little in terms of innovation in this space. The requirements of next-generation (NGFW) haven’t changed tremendously since its late 2000’s introduction to the market, and with the uptick in adoption of modern micro-services based architectures into the modern enterprise, applications are becoming more and more distributed in nature, with growing scale and security concerns around the ephemeral nature of the infrastructure.

Micro-services, which leverage a highly distributed architecture, have significantly increased the number of attack vectors or surface area of attack available for malicious actors to exploit. Moreover, many of these distributed architectures have made the network edge more porous. Additionally, the ephemeral nature of the modern application architecture has also decreased the visibility of threat intelligence for security teams tasked with maintaining their relative security posture.

Traditional Perimeter Firewall Architecture Problems

Here at VMware, we had a realization that the architectural nature (both from a feature/functions standpoint, as well as the actual placement in the overall architecture) of the traditional perimeter firewall is problematic to many of these modern trends happening in the data center. Some points to consider:

  • Potential sub-optimal data forwarding creating network choke points
  • Force infrequent and manual policy changes
  • Inadequate and inflexible model for granular policy definition
  • Lacks any application context or service awareness
  • Failure to keep pace with modern development practices (Agile, Dev/Ops, CI/CD), often leaving gaps in coverage relative to the continuous change


Modern Firewall Considerations

Simply put, there’s a massive increase in complexity with modern application architectures and the traditional perimeter firewalls do not solve the internal security problem. What is the internal security problem? Glad you asked—in speaking with many customers we believe we have defined what an internal firewall should do to address the growing security concerns and ever evolving attacks malicious actors are launching to compromise businesses.

Few would argue against the need to protect internal assets, particularly in light of a study released last year, that concluded the cost of a data breach in 2018 averaged out to be $3.86 Million.

Additionally, consider how much the industry has spent on protecting the perimeter to date. Many modern breaches you hear about on the news start from well-known vulnerabilities, but after the initial exploit, spread laterally within the environment because the internal security problem hasn’t been addressed. It’s time to add security back into the application. The application needs to be self-protecting in a defense-in-depth model. In the past, it was always relying on external things that wrap the application and the data. The distributed nature of modern applications increases the importance of the application’s ability to inherently be much more resilient and resistant to attacks.

We believe this requires a fundamental shift in security mindset and can be addressed in a few high-level ways:


Enter VMware’s Service-defined Firewall

VMware launched the Service-defined Firewall earlier this year. This solution asks one simple question—instead of chasing threats by relying on a reactive approach to firewalling, what if a firewall could reduce the attack surface of applications inside the perimeter by understanding and enforcing known good application behavior? By gaining system and service level insight to an application’s topology (e.g., down to an originating process that generates network I/O), the Service-defined Firewall has the unique ability to control application behavior using a variety of techniques.

As an example, the Service-defined Firewall combines AI and human intelligence to establish a verified model of known good application behavior. This combined with the additional network-centric constructs like L7 packet inspection and AppID, strengthen the overall security posture within the network perimeter, even more so when supplemented with more traditional firewall strategies like identity-based firewalling and tiered segmentation. From an overall architecture standpoint, the intrinsic nature of the Service-defined Firewall dictates the isolation between the controls and the attack surface itself, which becomes very important because even if a workload is compromised, the Service-defined Firewall cannot simply be disabled or by-passed.

This is how VMware is able to deliver consistent protection for your modern applications across the many places modern applications can live:


Putting the Service-defined Firewall to the Test

The VMware Service-defined Firewall Benchmark report has been released! VMware sponsored Coalfire, an independent cybersecurity advisory and assessment firm, to create this industry-first Service-defined Firewall benchmark report.

Coalfire conducted a micro-audit of the Service-defined Firewall capabilities to develop this benchmark report detailing the efficacy of VMware’s solution as a security platform. The micro-audit process included testing Service-defined Firewall features and functionality against simulated zero-day threats following common steps of the cyber kill chain model.

The results of this attack sequence are shown below:

Coalfire’s examination and testing of the Service-defined Firewall solution utilized simulated real-world exploits that depict likely hacker or attacker behavior in actual production network scenarios. The methodology used simulated real-world attacks that begin with the successful compromise of a vulnerable and exploitable machine within the network and then follow with attack propagation to other virtual or physical machines that share network access with the exploited VM.

Service-defined Firewall Resources

Please read the full report to learn all the in-depth technical details and testing methodologies.

Resources to Get Started:
Technical Resources:

The post Service-defined Firewall Benchmark and Solution Architecture appeared first on Network Virtualization.

The Field Guide to the Cloud Networking Sessions at VMworld 2019

$
0
0

Meet the expanded VMware NSX Product Family

Last year, we expanded the VMware NSX family of products to include NSX Data Center, NSX Cloud, AppDefense, VMware SD-WAN by Velocloud, NSX Hybrid Connect and NSX Service Mesh. This year, AVI Networks has joined our family. 

With the combined portfolio, we’re delivering on the Virtual Cloud Network vision of connecting, automating and protecting applications and data, regardless of where they are— from the data center, to the cloud and the edge. NSX delivers the full L2-services, enabling the public cloud experience for on-premises environments. 

Join us at VMworld US 2019

We will have an exciting line-up for VMworld US 2019Our engineers, technologists and customers will be speaking on 80+ topics throughout the conference spanning beginner to advanced levels throughout the conference. Some session topics include:

  • Multi-cloud Networking
  • Container Networking
  • Multi-site Networking
  • Network Automation
  • Service Mesh 

Cloud Networking Sessions at VMworld

In this post, we will focus on our cloud networking sessions and showcase keynotes. Use this handy guide to begin planning your exciting week and bookmark the sessions you want to attend. 

If you’re interested in security focused sessions, read the blog post on the top 10 security sessions and keynotes you must attend at VMworld.


Showcase Keynote Session

Be sure to attend our showcase keynote sessions where we will share insights about the future of networking and security. 

Showcase Keynote: Networking and Security for the Cloud Era [NETS3413KU]

  • Monday, August 26, 01:30 PM – 02:30 PM
  • Speaker: Tom Gillis (@_TomGillis), SVP and GM, Networking and Security, VMware 


Must-see Cloud Networking Sessions 

The Future of Networking with NSX [CNET1296BU]

  • Tuesday, August 27, 02:00 PM – 03:00 PM
  • Speakers: Bruce Davie, CTO, APJ, and Marcos Hernandez, Chief Technologist – Networking and Security, VMware 

Software Is Everywhere: Is Your Network Ready for the Future? [CNET2868BU]

  • Tuesday, August 27, 05:00 PM – 06:00 PM
  • Speaker: Pere Monclus, CTO Networking and Security Business Unit, VMware 

Virtual Networking Across Data Centers and Clouds with NSX [CNET2650BU]

  • Monday, August 26, 05:30 PM – 06:30 PM
  • Speakers: Nikhil Kelshikar, Senior Director and Umesh Mahajan, SVP NSX, VMware 

Extend Your Network and Security to AWS, Azure, and IBM Cloud [CNET1582BU]

  • Monday, August 26, 01:00 PM – 02:00 PM
  • Speaker: Percy Wadia, Director of Product Management, VMware 


More Cloud Networking Sessions by Day

Here’s my curated list of must-see sessions at VMworld 2019. Once you’ve register for VMworld, add them to your schedule builder to reserve your spot. 

Monday, Aug 26 

NSX-T Deep Dive: Performance [CNET1243BU]

  • Monday, August 26, 01:00 PM – 02:00 PM
  • Speaker: Samuel Kommu, Senior Technical Product Manager, VMware 

Deep Automation and Self-service for Application Delivery [CNET3672BU]

  • Monday, August 26, 02:30 PM – 03:30 PM
  • Speaker: Gaurav Rastogi, Director R&D, VMware 

Introduction to Container Networking [CNET2604BU]

  •  Monday, August 26, 02:30 PM – 03:30 PM
  • Speaker: Pooja Patel, Director, Technical Product Management, VMware 

Tuesday, Aug 27 

Introduction to NSX Service Mesh [CNET1033BU]

  • Tuesday, August 27, 11:00 AM – 12:00 PM
  • Speakers: Niran Even-Chen, Principal Systems Engineer, VMware and Oren Penso, Cloud Native Staff Systems Engineer, VMware 

VMware Cloud with NSX on AWS, Dell EMC, and AWS Outposts [CNET2067BU]

  • Tuesday, August 27, 05:00 PM – 06:00 PM
  • Speaker: Vyenkatesh Despande, Senior Product Line Manager, VMware 

Consistent Load Balancing for Multi-Cloud Environments [CNET3674BU]

  • Tuesday, August 27, 05:30 PM – 06:30 PM
  • Speakers: Abinav Modi, Technical Marketing Engineer and Ashish Shah, Senior Director, Product Management, VMware 

Wednesday, Aug 28 

Next-Generation Reference Design with NSX-T: Part 1 [CNET2061BU]

  • Wednesday, August 28, 08:30 AM – 09:30 AM
  • Speaker: Nimish Desai, Director, Technical Product Management, VMware 

NSX-T Design for Multi-Site Networking and Disaster Recovery [CNET1334BU]

  • Wednesday, August 28, 03:30 PM – 04:30 PM
  • Speaker: Dimitri Desmidt, Senior Technical Product Manager, VMware 

Next Generation Reference Design with NSX-T, Part 2 [CNET2068BU]

  • Wednesday, August 28, 12:30 PM – 01:30 PM
  • Speaker: Nimish Desai, Director, Technical Product Management, VMWare 

Thursday, Aug 29 

NSX-T Design for Small to Mid-Sized Data Centers [CNET1072BU]

  • Thursday, August 29, 10:30 AM – 11:30 AM
  • Speakers: Amit Aneja, Senior Technical Product Manager, VMware and Gregory Smith, Technical Product Manager, VMware 

NSX-T Deep Dive: Connecting Clouds and Data Centers via NSX-T VPN [CNET2841BU]

  • Thursday, August 29, 10:30 AM – 11:30 AM
  • Speaker: Ray Budavari, Senior Staff Technical Product Manager, VMware 

Why Networking and Service Mesh Matter for the Future of Apps [CNET2741BU]

  • Thursday, August 29, 01:30 PM – 02:30 PM
  • Speakers: Andrew Babakian, Principal Systems Engineer, VMware and Pere Monclus, CTO NSBU, VMWare 

Hands-on-Labs at VMworld

Our product leads and engineers worked double shifts to bring you the latest software and labs so that you can get hands-on-experience with the tech. Here’s a list of the expert-led cloud networking labs:

  • VMware NSX-T: Getting Started
  • VMware NSX for vSphere – Getting Started
  • Network Insight and vRealize Network Insight – Getting Started
  • NSX Cloud Consistent Networking and Security across Enterprise, AWS & Azure
  • Integrating Kubernetes with VMware NSX-T Data Center

 Sign up for our expert-led and self-paced Cloud Networking labs before spots fill up!

Operationalizing NSX-T Workshop

Now that you’ve set up NSX in your environment, what’s next? Learn how to run NSX for Day 0, Day 1 and Day 2 operations during our workshop.

Sign up for the Operationalizing NST-T Workshop (CNET2519WU) on Sunday, August 25, 10:30 AM – 04:30 PM. In the workshop we’ll cover:

  • A 300-level technical deep-dive on a typical topology deployment
  • Learn about security postures
  • How to monitor and troubleshoot NSX
  • Operationalize micro-segmentation across on-premises and public clouds

Networking & Security Demos

Visit the Networking and Security Business Unit’s demo pods at the VMware booth to see our latest demos and meet our technical experts from NSX Data Center, NSX Service Mesh, AVI Networks now part of VMware and more.


Demo Name Walk Throughs / How To’s

Automation and Network Operations


 Automate network operations and optimize network performance while implementing networking and security best practices

Multi-cloud Networking

Implement virtual networking connecting workloads across different types of compute infrastructure on-premises – VMs, Kubernetes/containers, and bare metal and for public clouds. Migrate legacy on-premises workloads to VMC on AWS

Container/Kubernetes Networking, Service Mesh

Deliver cloud native networking for containerized workloads running Kubernetes. Bring visibility, control and security to microservices using service mesh technology

Multi-cloud Application Delivery


Modernize application delivery and security powered by a software-defined distributed load balancer and web application firewall


Future:NET 2019

In its fourth year, Future:NET is for anyone who has forecast, created or disseminated change. It’s for those lured by new technology and its ability to transform the world—and for anyone who enjoys collaborating with like minds. Future:NET is your chance to:

  • Engage in live debate with cross-industry technical experts
  • Join lighting rounds with networking moguls
  • Help drive conversation as industry luminaries and pace-setting front runners connect the dots. 

We’re getting excited to welcome industry leading speakers to the stage at Future:NET on Thursday August 29, 2019 at the St. Regis in San Francisco. 

Request your exclusive invitation to Future:NET or if you have questions contact future.net@vmware.com

The post The Field Guide to the Cloud Networking Sessions at VMworld 2019 appeared first on Network Virtualization.

Service Mesh: The Next Step in Networking for Modern Applications

$
0
0

By Bruce Davie, CTO, Asia Pacific & Japan

What’s New in the World of Networking

As I’m currently preparing my breakout session for VMworld 2019, I’ve been spending plenty of time looking into what’s new in the world of networking. A lot of what’s currently happening in networking is driven by the requirements of modern applications, and in that context it’s hard to miss the rise of service mesh. I see service mesh as a novel approach to meeting the networking needs of applications, although there is rather more to it than just networking.

There are about a dozen talks at VMworld this year that either focus on service mesh or at least touch on it – including mine – so I thought it would be timely to comment on why I think this technology has appeared and what it means for networking.

To be clear, there are a lot of different ways to implement a service mesh today, of which Istio – an open-source project started at Google – is probably the most well-known. Indeed some people use Istio as a synonym for service mesh, but the broader use of the term rather than a particular implementation is my focus here.

The Emergence of Service Mesh

My first exposure to the concepts of service mesh came about two years ago during the Future:NET conference. Thomas Graf gave a presentation on the Cilium project, and to motivate the work he showed why traditional network-level security isn’t sufficient for securing the communication paths among microservices. His example showed how one microservice could be connected to another with all the security enforced within the network, using firewalls for example. The problem with such a security model is that the entire API of a microservice is exposed to any other service that is allowed to connect to it. Given that the API is most likely implemented with TLS (Transport Layer Security) to authenticate endpoints and encrypt the traffic, there’s really no way for network-layer devices to enforce any sort of policy at the API layer.

One might conclude that the obvious answer is to implement this sort of control inside the application, but that has its own set of drawbacks. As summarised by Chenxi Wang, this would lead to lots of redundant code, implemented by many teams in different languages – with implications for efficiency, performance, and security. Furthermore, there’s value in exposing a common set of controls on this application-level communications mesh, so that meaningful policies can be set in a consistent way across all microservices.

At last year’s Future:NET, Louis Ryan, one of the Istio project leaders, gave another memorable talk on service mesh, including some interesting reasons for its adoption. Imagine you wanted to add service mesh capabilities to an existing piece of code. As Louis pointed out, a good analogy to opening up an old piece of code is opening up an old can of surströmming – a sort of fermented fish. YouTube is full of cautionary tales on this topic. The point here is that there are real advantages to adding service mesh capabilities to your applications non-intrusively.

Problems Service Mesh Solves

Service mesh is the emerging solution to the preceding problems. It provides a uniform way to:

  • Implement application-aware security policy
  • Traffic management, monitoring, and load balancing
  • A range of other useful functions among communicating microservices

Service Mesh and Network Virtualisation

There are considerable similarities between service meshes and network virtualisation overlays such as that implemented by NSX Data Center. Like NSX, a service mesh has a centralised control plane and a distributed data plane (see figure). The data plane component of a service mesh is called a sidecar proxy, of which Envoy is the most well-known example. Istio is a control plane that integrates with Envoy.


Istio diagram

There are some key differences between a network virtualisation system like NSX Data Center and a service mesh (explored in detail here) — especially how close they sit to the application. NSX Data Center processes network traffic as it enters and leaves a container or VM – which means that it’s not close enough to the application for things like API-granularity access control. Conversely, the sidecar proxy of a service mesh can be inserted right into the same Kubernetes pod in which the microservice is running, for example, so it can provide application-level services. Service mesh recognizes that the end point of a communication is a service, not just a machine or a device.

As service mesh becomes more mainstream, I expect that plenty of enterprises will be looking for easy ways to introduce service mesh capabilities to their infrastructure. NSX Service Mesh is a new product that aims to meet the needs of those enterprises. Because there is so much rapid innovation in the open source world around service mesh, we expect open source efforts – like Istio and Envoy – to be central to our work, just as Open vSwitch has been central to our development of network virtualisation. Simplifying adoption of these open source projects will be key for enterprises, and an area of focus for us.

Service Mesh Resources

There are several blog posts already about NSX Service Mesh:

I’m looking forward to spending a bit more time on this topic during my session at VMworld, and if all goes to plan we’ll have a live demo as well. I hope to see you in San Francisco.


The post Service Mesh: The Next Step in Networking for Modern Applications appeared first on Network Virtualization.

VMware Cloud on AWS: NSX Networking and Security eBook

$
0
0

Check out my latest book co-authored with my colleagues Gilles Chekroun (@twgilles) and Nico Vibert (@nic972) on VMware NSX networking and security in VMware Cloud on AWS. Thank you Tom Gillis (@_tomgillis), Senior Vice President/General Manager, Networking and Security Business Unit for writing the foreword and providing some great insight.

Download the eBook for Free

I’ve been very fortunate to have the opportunity to publish my second VMware Press book. My first book was VMware NSX Multi-site Solutions and Cross-vCenter NSX Design: Day 1 Guide. This book was focused very much on NSX on prem and across multiple sites. In my latest book with Gilles and Nico, the focus was on NSX networking and security in the cloud and cloud/hybrid cloud solutions.

You can download the free ebook here:

In this book you’ll learn how VMware Cloud on AWS with NSX networking and security provides a robust cloud/hybrid cloud solution. With VMware Cloud on AWS extending or moving to the cloud is no longer a daunting task. In this book, we discuss use cases and solutions while also providing a detailed walkthrough of the NSX networking and security capabilities in VMware Cloud on AWS.

VMware Press - VMware Cloud on AWS: NSX Networking and Security

Attending VMworld 2019?

If you’re attending VMworld 2019 in US or Barcelona, we will be doing a book signing and handing out free hard copies as well as selling the book at the VMworld book store; stay tuned for specifics in time and location. We’ll also be making the hard copy book available for sale online at the NSX Bookstore.

Sessions at VMworld to Attend

Also, if you would like to know more about NSX networking and security in VMware Cloud on AWS and cloud/hybrid cloud solutions, make sure to attend the below sessions. Hope to see you there!

VMworld 2019 Sessions

Session: VMware Cloud on AWS: NSX-T Networking and Security Deep Dive [CNET1219BU]
Speakers: Humair Ahmed, Sr Technical Product Manager, VMware and Haider Witwit, VMware Specialist , AWS


Session:
VMware Cloud on AWS: Networking and Security Design [HBI1223BU]
Speakers: Humair Ahmed, Sr Technical Product Manager, VMware and Ed Shmookler, Staff VMware Cloud SE, VMware


Session:
VMware Cloud with NSX on AWS, Dell EMC, and AWS Outposts [CNET2067BU]
Speakers: Venky Deshpande, Sr Product Line Manager, VMware and Jake Kremer, Sr Network Engineer, Direct Supply, Inc

Resources

The post VMware Cloud on AWS: NSX Networking and Security eBook appeared first on Network Virtualization.

Attend Future:NET 2019 – a Premier Networking Event

$
0
0

What is Future:NET?

Is it a thinktank? A forum? An incubator?

4 years ago VMware launched Future:NET with a simple idea of bringing together some of the brightest minds in networking together for an open and honest conversation about the future direction of networking.

While other networking conferences have been reduced to vendor showcases, Future:NET has banned product pitches in exchange for open debates that foster intellectual conversation among professionals across the industry.

Why Attend Future:NET 2019?

Come join us at Future:NET 2019, a premier networking technology event, where we are bringing together everyone from enterprises, startups, and academics to debate and challenge the status quo. Wizards may predict the future, but you should plan to come and play a key role with interactive sessions and network with your peers.

This year we are continuing the tradition of open conversation on technology shifts, the organizational challenges they bring and asking the question “are we really making things simple?”. Topics range from the emergence of XaaS, integrated operation models (SOCs vs NOCs), and the effect of 5G, LISP, and v6 on networking. Join experts from Microsoft, AWS, Stanford, and more as they drive deep technical discussions on the future of the networking landscape.

Request an Invite

Requesting an invite is open to everyone, but attendance is not guaranteed due to the exclusivity of the event. You can request an invite to Future:NET 2019 here. Space is filling up so apply now!

Future:NET banner

Sessions at Future:NET 2019

The wizards of networking predict architectural shifts to happen by 2025

Prediction or certainty? Each wizard will have a chance to forecast the future state of networking in this lightning round capturing the impact of security, from the bits and bytes of hardware, to the role of software, to multi-cloud. How will networking architectures shift? Containers? Going serverless? No tarot here, these are experts.

DC network-focused, or DC infrastructure-focused? Other?

For decades IT professionals focused on buying, building, and managing infrastructure. The emergence of XaaS is completely changing what is procured, provisioned, and managed. Pundits have proposed with the advent of AI/ML and new cloud services, Infrastructure and Operations teams will simply buy SLAs. Is that paradise possible? Is it just another cruel promise never to be fulfilled? There might be one man on the planet with the answer, and he’s got the chops to guide you through it.

Networks should be simple, right?

Simplify, simplify, simplify. What’s the best approach? That’s open for debate—as in “open source” hardware and software, hyperscale designs, and automation. How will the transitions around IP, MPLS, v6, LISP, and 5G impact the future of networking? Let’s hear from the specialists.

SOCs? NOCs? Both, just one, or maybe one and a half?

Do we really need both? What could an integrated operation model unlock? Is the technology ready? Are the people? Can the mindset really be shifted? Thirty minutes, so many questions. Fortunately, we have John Pescatore who is the authority on the matter and brings SANS’ unique points of view.

  • John Pescatore—Director, Emerging Security Trends / SANS Institute

The keepers—who should control the keys?

Network admins, security admins, and developers all carry sets of keys. But who should really hold the identity, network policy, and security policy keys to the kingdom? This group of tech leaders will get on their respective soapboxes and rationalize their stance, but ultimately you get to decide the outcome through an audience poll.

  • Forrest Bennett—Cyber Security Advisor / FedEX Services
  • Lane Patterson—Co-founder, Investor, Board Member, Infras. & DevOps Expert / Global Webscale
  • John Pescatore—Director, Emerging Security Trends / SANS Institute

What’s next in Branch+?

Let’s delve into the world of edge networking, the Internet of Things, 5G, and innovations in SD-WAN. Join Mike Frane as he spells out the impact of these developments on emerging networking architectures and infrastructure. He’s got the expertise and the real-world experience to do it.

  • Mike Frane—VP Product Management of Network, Security, Digital Experience / Windstream Enterprise

Networking—from automation to operations.

The internet was designed to keep running even after a nuclear attack, but now it can’t survive when the lead network engineer goes out on PTO. AI Ops, DevOps, chaos monkeys, distributed visibility, self-healing, roles and responsibilities, and changing interactions… (deep breath). You will be nodding your head in agreement as experts describe fails, follies, and fixes.


IT organizations of the future—a tale of org charts.

Buckle up for skill gaps, siloless IT, and the role of networking—structure, operational models, tooling, and worst of all, certifications—as two esteemed leaders propose their vision for the org chart of the future. Dog fight? Maybe. Thought provoking? Definitely. Either way, you’ll be compelled to listen.

The post Attend Future:NET 2019 – a Premier Networking Event appeared first on Network Virtualization.

VMworld 2019: Sneak Peak at Our Keynote Sessions. Plus a Chance to Win!

$
0
0

Networking & Security Keynotes at VMworld 2019


About a month ago, we published a VMworld security guide, which shortlisted 100 to 300 level sessions that best illustrate real-world application of our products. This time, we’ll be focusing on two networking and security keynotes. The first keynote will highlight how VMware’s single-stack, complete networking and security platform can achieve a consistent operational network fabric for hybrid cloud environments, and the second keynote will focus on how users can leverage existing VMware infrastructure to implement a more effective, intrinsic security.

In addition, you will have a shot at winning Bose headphones simply by attending each event. Duplicate winners will be acknowledged so if you are looking for a present for yourself and a significant other, make sure to register and save on your yearly bonus! Winners will be announced at the end of each keynote, so make sure to stay until the end!


Showcase Keynote: Networking and Security for the Cloud Era [NETS3413KU]


Single NSX Stack


There has never been a more exciting and challenging time in the networking space. As the cloud, application developers, IoT, and edge drive a new wave of innovation and digital transformation, networking must effectively connect all key components. In this Networking and Security Keynote, Tom Gillis, SVP/GM of the NSBU, will share the latest roadmap for the Virtual Cloud Network, VMware’s networking vision in today’s digital age. You will hear about our latest NSX Advanced Load Balancer from AVI Networks and hear first-hand accounts from organizations that are embracing the our strategy and vision. Customers will explain how utilizing the NSX portfolio has delivered a one-touch experience for automating network and provisioning policies for applications. This session is not only beneficial to newcomers looking for an introduction to NSX but also relevant for VMworld veterans looking to deepen their knowledge about NSX Cloud, SD-WAN by VeloCloud, and AppDefense.

SPEAKERS

Tom Gillis, SVP/GM, NSBU, VMware

Monday, August 26, 1:30 PM – 2:30 PM | Moscone South, Level 2, Room 207


Showcase Keynote: Intrinsic Security – How Your VMware Infrastructure Can Turn the Tide in Cybersecurity [SEC3412KU]


Security Controls


Security threats, breaches, and exploits are becoming more prevalent with no end in sight. In 2019 alone, there were 95+ major breaches that affected dozens of established firms and institutions such as Dunkin Donuts, Rubrik, BlackRock, and Sprint. The attack surface is multiplying at a blistering rate, and it has birthed a myriad of security vendors that have created more problems than they have solved. What’s worse is that the majority of these security innovations is heavily skewed towards products that are reactive in nature, but is this an effective approach? In this Intrinsic Security Keynote, Tom Corn and Shawn Bass will discuss why the ratio needs to flip in favor of innovation that is preventative in nature. Security will never be optimized when seen in the context of playing catch-up, and procedures such as whitelisting, micro-segmentation, and vulnerability management must be utilized more frequently to develop an approach that is one step ahead of attackers. In addition, you will have the opportunity to see how our flagship products like Secure StatevSphereNSXvSANVMware CloudWorkspace ONE are perfectly positioned to support your apps, data, and users, and when used in conjunction with AppDefense. This is a must-attend session for those interested in learning more about how VMware is making an impact in the security space.

SPEAKERS

Tom Corn, Senior VP, VMware

Shawn Bass, VP, CTO – EUC, VMware

Tuesday, August 27, 5:30 PM – 6:30 PM | Moscone West, Level 2, Room 2020


The post VMworld 2019: Sneak Peak at Our Keynote Sessions. Plus a Chance to Win! appeared first on Network Virtualization.

VMware Cloud on AWS: NSX and Avi Networks Load Balancing and Security

$
0
0

Authors and Contributors

I want to thank both Bhushan Pai, and Matt Karnowski, who joined VMware from the Avi Networks acquisition, for helping with the Avi Networks setup in my VMware Cloud on AWS lab and helping with some of the details in this blog.

Humair Ahmed, Sr. Technical Product Manager, VMware NSBU
Bhushan Pai, Sr. Technical Product Manager, VMware NSBU
Matt Karnowski , Product Line Manager, VMware NSBU

With the recent acquisition of Avi Networks, a complete VMware solution leveraging advanced load balancing and Application Delivery Controller (ADC) capabilities can be leveraged. In addition to load balancing, these capabilities include global server load balancing, web application firewall (WAF) and advanced analytics and monitoring.

In this blog, we walk through an example of how the Avi Networks load balancer can be leveraged within a VMware Cloud on AWS software-defined data center (SDDC).

Deep Dive on VMware Cloud on AWS at VMworld 2019

Also, if you would like additional details or would like to see a demo, come  speak to us in person at upcoming VMworld! I will be presenting this specific demo in the second session below, VMware Cloud on AWS: Networking and Security Design [HBI1223BU]. Bhushan Pai from the VMware Avi Networks team will also be in attendance for this session and we will have plenty of time to answer all questions. I’ll be discussing the solution in both sessions, but if you can only attend one and want to see this demo, attend the second session below. The Deep Dive session already has has many other cool demos :-).

VMworld 2019 Sessions to Register For

Session: VMware Cloud on AWS: NSX-T Networking and Security Deep Dive [CNET1219BU]
Speakers: Humair Ahmed, Sr Technical Product Manager, VMware and Haider Witwit, VMware Specialist , AWS

Session: VMware Cloud on AWS: Networking and Security Design [HBI1223BU]
Speakers: Humair Ahmed, Sr Technical Product Manager, VMware and Ed Shmookler, Staff VMware Cloud SE, VMware

Leveraging Avi Networks Load Balancer within VMware Cloud on AWS SDDC

In the below diagram, you can see I’ve deployed a network segment named Web. Three web servers have been deployed on this Web network segment. You can also see a network segment named MGMT where the Avi Networks controllers are deployed; these are basically deployed OVF appliances.

There is also a network segment deployed named LB. This is where the Avi Networks service engines or load balancers are deployed. First, the Avi controllers are deployed, and then from the Avi Networks management console, accessible by accessing the IP address of any of the controllers, the service engines or load balancers are deployed.

Figure 1: VMware Cloud on AWS with NSX and Avi Networks Load Balancer ADC

Figure 1: VMware Cloud on AWS with NSX and Avi Networks Load Balancer ADC

Note: you may have seen some designs where the load balancer appliance is connected to each network segment it is providing load balancing for. Although this design will work, it is not ideal because of the additional configuration required and the limitation that a virtual appliance can only have ten interfaces.

In the design shown above, you can see the Avi Networks service engines or load balancers route to and from the web servers they are providing load balancing for. This design is recommended for several reasons:

  • Can scale out better as there is no need to connect networks you need load balancing services for directly to the load balancing appliance
  • There is less configuration and complexity involved
  • Less error prone as you don’t need to manually connect each network segment to the appliance
  • Note: the Avi Networks service engines are connected to both the MGMT network and LB network; this provides separation of management/control traffic and dataplane traffic.

In the below diagram, you can see workloads On Prem are accessing the VMware Cloud on AWS SDDC over Direct Connect Private VIF.

Figure 2: Workloads On Prem Accessing Web Servers Sitting Behind Avi Networks Load Balancer in the SDDC

Figure 2: Workloads On Prem Accessing Web Servers Sitting Behind Avi Networks Load Balancer in the SDDC

You can see from below screen shot of the Avi Networks management graphical user interface (GUI), I have configured a virtual IP (VIP) of 10.61.4.66; also, note, the services being load balanced: HTTPS (port 443) and HTTP (port 80). The pool for the virtual service to use is also selected and you can see WAF policy is also enabled.

Figure 3: Avi Networks Virtual Service Configuration

Figure 3: Avi Networks Virtual Service Configuration

Avi Networks also provides monitoring and analytical data like throughput and latency. Both the virtual service  and the server pool have graphs and tables showing different analytical data. Switching over to the server pool I created, I’m presented with the below graph.

Figure 4: Avi Networks Server Pool Analytics

Figure 4: Avi Networks Server Pool Analytics

Below I click the Servers tab, to see the respective servers I have configured in this pool; the health status of each server is shown.

Figure 5: Configured Server Pool Members and Health

Figure 5: Configured Server Pool Members and Health

You can click the ‘pencil’ icon on the top right to see the configuration or modify settings like Load Balancing algorithm; you can see below I have selected Round Robin as the load balancing algorithm.

Figure 6: Configured Server Pool Load Balancing Algorithm

Figure 6: Configured Server Pool Load Balancing Algorithm

Clicking on the Servers tab allows you to modify the server pool membership.

Figure 7: Configured Server Pool Membership

Figure 7: Configured Server Pool Membership

Using a web browser, I enter the domain name system (DNS) server name for my web server. The web page requests are load balanced via round robin algorithm as expected. The first request goes to web server 1.

Figure 8: Avi Networks Load Balancer with Round Robin Load Balancing Algorithm - Hitting Web Server 1

Figure 8: Avi Networks Load Balancer with Round Robin Load Balancing Algorithm – Hitting Web Server 1

The second request goes to web server 2.

Figure 9: Avi Networks Load Balancer with Round Robin Load Balancing Algorithm - Hitting Web Server 2

Figure 9: Avi Networks Load Balancer with Round Robin Load Balancing Algorithm – Hitting Web Server 2

The third request goes to web server 3.

Figure 10: Avi Networks Load Balancer with Round Robin Load Balancing Algorithm - Hitting Web Server 3

Figure 10: Avi Networks Load Balancer with Round Robin Load Balancing Algorithm – Hitting Web Server 3

The really cool thing about Avi Networks load balancer is that it is a full blown Application Delivery Controller (ADC) and can be leveraged for things like WAF. To demonstrate this, I make the next website request via IP address of the VIP on the Avi Networks service engine/load balancer. Remember from prior in the post, WAF is already enabled, so this action will automatically be flagged.

Below I make the next website request via IP address of the VIP on the Avi Networks service engine/load balancer instead of the DNS name as prior.

Figure 11: Making Webpage Request via IP Address Instead on DNS Name

Figure 11: Making Webpage Request via IP Address Instead on DNS Name

Now, I go back to the Avi Networks management console and take a look at the logs. As you can see, the last web request has been flagged.

Figure 12: Avi Networks Management Console Displaying Logs and Flagged Web Page Request

Figure 12: Avi Networks Management Console Displaying Logs and Flagged Web Page Request

You can also click on the specific log to see exactly why the request/traffic was flagged and what WAF specific rule(s) were triggered. After clicking in the log, you will see client information such as the below which include, IP Address, web browser used, operating system used, and other client details.

Figure 13: Avi Networks Management Console - Logs Showing Client Information for Flagged Request/Traffic

Figure 13: Avi Networks Management Console – Logs Showing Client Information for Flagged Request/Traffic

Scrolling down, you can see the exact WAF rule that caused the flagging. In this case, the flag was the result of an IP address being used instead of a DNS name.

Figure 14: Avi Networks Management Console - Log Showing Specific WAF Rule That Caused Flagging

Figure 14: Avi Networks Management Console – Log Showing Specific WAF Rule That Caused Flagging

Clicking on the WAF Rules under WAF Analytics on the right side menu you can see all the WAF rules that have been triggered since the web server has been up and the most frequently hit rules. This is pretty cool as it give you some good insight on what’s going on, traffic behavior, and things you may want to address.

Figure 15: Avi Networks Management Console Displaying Which WAF Rules are Hit Most Often

Figure 15: Avi Networks Management Console Displaying Which WAF Rules are Hit Most Often

Clicking on WAF Latency gives you a good view on what latency users are experiencing. Clicking further in, you can also see which specific clients are seeing the most latency.

Figure 16: Avi Networks Management Console - WAF Displaying Latency Details

Figure 16: Avi Networks Management Console – WAF Displaying Latency Details

You may be asking yourself, if instead of detection or just flagging, you can take a specific action like dropping traffic if WAF rules are hit – the answer is, yes.

First, go to Virtual Services – > Click you virtual service you want to configure ->Click the WAF tab. You will see something like the below where you can see all the rules enabled; you can also modify the configuration and disable specific rules here.

Figure 17: Avi Networks Management Console - WAF Settings

Figure 17: Avi Networks Management Console – WAF Settings

Next, click on the ‘pencil’ icon at the top right and again click on the ‘pencil’ icon under WAF Policy. You will then see the option to change the mode from Detection to Enforcement as shown below.

Figure 18: Avi Networks Management Console - Changing WAF Mode Between Detection and Enforcement

Figure 18: Avi Networks Management Console – Changing WAF Mode Between Detection and Enforcement

Pretty cool stuff right! You can now leverage Avi Networks Load Balancer ADC in VMware Cloud on AWS for both load balancing and security for your applications!


VMware Cloud on AWS Resources

The post VMware Cloud on AWS: NSX and Avi Networks Load Balancing and Security appeared first on Network Virtualization.


Announcing a New Open Source Service Mesh Interoperation Collaboration

$
0
0

Service mesh is fast becoming such a vital part of the infrastructure underlying microservices and traditional applications alike that every industry player must have an offering in the space. Because a variety of differentiated service meshes and service mesh services are emerging, it has become clear that interoperability between them will be critical for customers seeking to interconnect a wide variety of workloads.

With that in mind, we are excited to share that VMware has partnered with Google Cloud, HashiCorp, and Pivotal on an open source project for service mesh interoperability. This initiative will facilitate federation of service discovery between different service meshes of potentially different vendors. Through an API, service meshes can be interconnected to deliver the associated benefits of observability, control, and security across different organizational unit boundaries, and potentially across different products and vendors. The project will soon be opened to the community, and anyone interested in contributing to this effort can do so on GitHub.

Partnering With Industry Leaders on Service Mesh Interoperation

Enterprises increasingly rely on APIs to coordinate business functions that span departmental, organization or vendor boundaries. This implies reliability, operability, security and access constraints on these API calls to ensure business is not disrupted. Service mesh technology has enabled these properties for internal traffic. This proposal enables extending these properties to traffic flowing between different mesh deployments and implementations in a composable and dynamic way. This enables businesses to quickly establish relationships for APIs and services and have confidence in how that traffic is secured.

Service Mesh Interoperation

Interoperating service mesh products from different vendors is a challenging task. To create an ecosystem of service mesh communities, vendors, and services that are broadly useful and widely adopted, it is necessary for early innovators in the space to establish a standard for mesh interoperability. That is why we would like to thank Google Cloud, HashiCorp, and Pivotal for working together with VMware to kick off this initiative.

“Service mesh solutions are quickly becoming a necessity for organizations transitioning to microservice environments,” said Burzin Patel, VP of Worldwide Alliances at HashiCorp. “It’s important that these customers have a way to connect these solutions across other environments, virtual machines, and containers, and that’s where Consul Service Mesh can help. We’re pleased to have partnered with VMware on this specification. Our hope is that it will make it easier for all organizations to deploy a service mesh for connecting their applications across any platform.” 

“The service mesh has become essential to enterprises who need strong security and deep insight into how their distributed applications function, especially as they transition to newer architectures and hybrid-cloud environments,” said Jennifer Lin, Director of Product Management at Google. “Many of our customers are running Istio in production to achieve those needs today. The work we are doing with industry partners on interoperability helps ensure our Anthos customers can have their services communicate securely regardless of whether they are running on premises or in the cloud, on virtual machines or in Kubernetes.”

“Application developers and platform operations teams are recognizing the benefits of service mesh technologies for delivering speed, stability, scalability, security and savings,” said Ian Andrews, Senior Vice President, Products at Pivotal. “Large organizations leverage technology from multiple vendors, so interoperability is essential. Pivotal is excited to be collaborating on standards for mesh interoperation that will enable transformational business outcomes for our customers.”

Abstraction is in VMware’s DNA

Abstraction is where we began as a company and has continued to drive our success for over twenty years. We understand how to build solutions that are not tied to any specific cloud or platform, even to the point where we abstract our own products. We also understand that, as it goes with abstraction layers, customers start with one use case and can end up with many more. This collaboration will enable customers to use whatever service meshes they need as new use cases present themselves, resulting in an ecosystem that works for everyone.

What This Means for Service Mesh Users

There are multiple business objectives that can be achieved through mesh interoperation use cases:

  • Customers who are progressively migrating from legacy libraries linked to programming languages or frameworks to a fully fledged service mesh can do so more quickly and with less disruption to their operations.
  • Customers have the freedom to choose different service mesh products in different, geographically dispersed data centers or branches, under different organizational unit boundaries within the same company.
  • Customers have the freedom to migrate and run workloads between the data center and public cloud, or across clouds, when there are different service meshes running in those environments.
  • For customers already running a service mesh but that don’t yet have conventions for network addressing, workload namespacing, identity, and security policy; mesh interoperability accelerates the migration path to something more uniform.
  • Service publishers can have visibility on which customers are consuming their services in order to bill, provide SLOs, and react to outages.

Through this open source project and the collaborative effort of the teams involved, Istio, Google Cloud’s Anthos, Hashicorp Consul, Pivotal Service Mesh, and VMware NSX Service Mesh can interoperate, enabling customers to discover and secure communications between services across these meshes.

Learn More at VMworld!

If you would like to learn more about VMware NSX Service Mesh and this interoperation initiative, these are the right sessions to attend during VMworld San Francisco 2019!

The post Announcing a New Open Source Service Mesh Interoperation Collaboration appeared first on Network Virtualization.

NSX-T 2.5 – A New Marker on the Innovation Timeline

$
0
0

NSX-T has seen great success in the market for multi-platform network and security use-cases, including automation, multi-cloud adoption, and containers as customers move through the digital transformation initiative. NSX-T is the industry’s only network and security platform delivering a wide range of L2-L7 services, built from the ground up for workloads running on all types of infrastructure – virtual machines, containers, physical servers and both private and public clouds.

This year, we are hyper-focused on innovation, and in bringing transformative capabilities to market through NSX-T, which is the foundation for both our VMware NSX Data Center and NSX Cloud offerings. This release of NSX-T further strengthens our intrinsic security capabilities architected directly into networks and public and private cloud workloads that applications and data live on, reducing the attack surface. This version also keeps up the accelerated pace of innovation we are delivering on for scalability, cloud-native support, and operational simplicity which can accelerate customers’ adoption of a Virtual Cloud Network architecture.

Key Focus Areas in NSX-T 2.5


Launching NSX Intelligence – A Native, Distributed Analytics Engine

Analytics-based policy recommendation and compliance, streamlined security operations

NSX Intelligence is a distributed analytics engine that provides continuous data-center wide visibility for network and application security teams helping deliver a more granular and dynamic security posture, simplify compliance analysis, and streamline security operations.

Traditional approaches involve sending extensive packet data and telemetry to multiple disparate centralized engines for analysis, which increase cost, operational complexity, and limit the depth of analytics. In contrast, NSX Intelligence, built natively within the NSX platform, distributes the analytics within the hypervisor on each host, sending back relevant meta-data to a scale-out, lightweight appliance for visualization, reporting and building machine-learning models.

Combining the deep workload and network context unique to NSX, the engine provides detailed application topology visualization, automated security policy recommendations, continuous monitoring of every flow, and an audit trail of security policies, all built into the NSX management console for a single-pane-of-glass experience.

NSX Intelligence: Flow-based Visualization and Automatic Policy Recommendation

NSX Intelligence, the crown jewel of the NSX-T 2.5 release, is making a big splash at VMworld 2019 US. Watch this space for a detailed blog on NSX Intelligence in a few weeks.

Hybrid Cloud Networking and Security with NSX Cloud

New operational mode adds choice and flexibility for customers

NSX Cloud offers customers a new model for multi-cloud network management that provides consistent networking and security for applications running natively in the public cloud, and across multiple public clouds. When paired with NSX Data Center, NSX Cloud provides operators a single view of networking services and security policies that are applied to all workloads, whether on VMs running in a private data center, or workloads hosted in AWS or Azure.

With NSX-T 2.5, we are building upon the success of NSX Cloud and introducing a new deployment and operational mode referred to as the Native Cloud Enforced mode. This mode provides a consistent policy model across the hybrid cloud network and reduces overhead by eliminating the need to install NSX tools in workload VMs in the public cloud. The NSX security policies are translated into the cloud provider’s native security constructs via APIs, enabling common and centralized policy enforcement across clouds.

In contrast to the new mode, the original mode of operation, the NSX Enforced mode, leverages NSX tools for uniform and granular policy enforcement. This mode provides truly consistent policy across clouds, directly controlled by NSX, and despite the discrepancies between cloud providers’ native constructs or the unique characteristics of each cloud provider’s security controls.

Each of these modes has its own set of advantages, giving customers the flexibility to choose the option that best meets their needs. Today, NSX Cloud is the only hybrid cloud solution in the market to support both an agent-based and agentless mode of operation.

Native Cloud Enforced mode in NSX Cloud on Azure

Keep an eye out for a detailed blog post discussing the full set of NSX Cloud capabilities in NSX-T 2.5.

Security Enhancements and Compliance

NSX-T achieves FIPS 140-2 compliance!

As a long-time software provider for the US Federal Government, VMware is committed to delivering products and services that meet various regulatory compliance requirements and can support the most secure and sensitive environments. We are proud to announce that NSX-T 2.5 has completed FIPS testing and is officially FIPS compliant. In other words, starting NSX-T 2.5, customers will have the ability to generate a FIPS compliance report, which enables customers to configure/manage their NSX deployments in FIPS compliant mode.

FIPS compliance has been widely adopted around the world in both governmental and non-governmental sectors (e.g. financial services, utilities, healthcare), as well as Fortune 100 companies, as a practical security benchmark and a realistic best practice. Stay tuned for a detailed blog post on FIPS in the coming weeks!

Bolstering the intrinsic security arsenal with Layer 7, VPN, and more

The explosion of new, complex application architectures requires sophisticated defense mechanisms that understand application services and implement strategies like micro-segmentation to reduce the attack surface of the network. Earlier this year, VMware introduced the Service-defined Firewall at RSA. Software-defined Firewall is a combination of NSX and AppDefense designed specifically to mitigate threats inside a data center or cloud network. NSX-T delivers security to diverse endpoints such as VMs, containers, and bare metal, as well as to various cloud platforms.

In this release, NSX-T continues to amp up its ability to deliver consistent, pervasive connectivity and intrinsic security for applications and data across any environment.

Extending Layer 7 support to NSX Edge Firewall and KVM environments

A deeper level of application visibility and control is required as applications have become more complex. NSX-T supports rich security enforcement capabilities such as L4-L7 stateful distributed firewalling (DFW), Identity/User ID firewalling, and FQDN/URL whitelisting.

This release brings the ability to apply Layer 7 application ID-based or context-aware rules to the NSX edge (gateway) firewall for north-south traffic.

NSX-T 2.5 also enables support for Layer 7 application ID-based DFW in KVM environments, further strengthening the platform’s multi-hypervisor capabilities.

VPN Enhancements for Multi-tenancy

With this capability, cloud providers, such as VMware Cloud Provider partners, can easily scale their multi-tenant cloud solutions. They can now provide per-tenant IPSec VPN connectivity, resulting in better tenant isolation and a more scalable architecture. Previously, IPsec connectivity was supported only on Tier 0 gateways.

Packet Mirroring for East-West Traffic Monitoring (via Service Insertion)

NSX-T now supports the ability to forward a duplicate copy of packets to a partner Service Virtual Machine (SVM) such as Gigamon and NETSCOUT for inspection, monitoring or collection of statistics. This eliminates the need to pass the original packets through the network monitoring service, improving network latency and making the monitoring process seamless and non-intrusive.

Additionally, we have added several security enhancements such as multiple App-ID profiles per rule, FQDN/URL on KVM, and context/metadata subscription for north-south Service Insertion.

Simplified Operational Experience

Driving toward a better user experience with enhanced firewall operations and dashboards

How does NSX bring the public cloud experience to on-premises data centers? By making operations simple and consistent. One thing we set our mind to early on was improving the user experience at every level – UI, dashboards, APIs, systems – and for all users – network and security admins, sysadmins, DevOps, developers. This release brings several enhancements that makes it easier to operate seamlessly from a Day 2 perspective.

Streamlining Firewall Operations: This capability provides the ability to save DFW rule configuration as drafts (both automatic and manual) and revert or rollback to a previous configuration if needed, simplifying troubleshooting and remediation. There are several cool features included, such as, draft cloning, multi-user drafting and locking, and adjustable timeline and search functionality.

Distributed Firewall Config: Auto/Manual Drafts, Rollbacks

Capacity Monitoring Dashboard: This includes the addition of several improvements and additional metrics to the capacity dashboard which show the number of objects (such as Logical Switches, TO/T1 Logical Routers, DHCP Server instances, System-wide NAT rules) configured relative to the maximum supported in the product.

Industry Leadership, Joint Engagements, New Avenues

NSX continues to be a disruptor in the networking and security space. NSX is a core element of many VMware solutions such as VMware Cloud Foundation, VMware Cloud on AWS, and VMware vCloud NFV. NSX is also at the center of many of VMware’s strategic partnerships and joint solutions with companies such as AWS, Azure, Dell Technologies, Google Cloud and IBM Cloud. Most recent ones include the VMware Cloud on Dell EMC solution launched at Dell Tech World and the Azure VMware Solutions which generally available starting May this year. And last year, the VMware-AWS partnership reached a new level with the announcement of two new solutions –VMware Cloud on AWS Outposts and VMware Cloud Foundation for Amazon EC2.

Summary

This release expands the breadth and depth of several use-cases in security, automation, multi-cloud networking, and cloud-native applications. The Virtual Cloud Network is the ultimate destination for customers, supported by NSX-T to enable consistent networking and intrinsic security for workloads of any type (VMs, containers, bare metal) and located anywhere (data center, cloud, edge). Watch this space for a series of deep-dive blogs on some of the key capabilities supported in this release of NSX-T 2.5. Note that the NSX-T 2.5 release is expected to start shipping in a few days.

Hope you have a great time at VMworld 2019 US!

NSX-T Resources


The post NSX-T 2.5 – A New Marker on the Innovation Timeline appeared first on Network Virtualization.

Avi Networks — Same Team, Same Mission, New Home

$
0
0

Avi Networks is now part of VMware and our product is now called VMware NSX Advanced Load Balancer. You can read about it here in our press release from VMworld.

But our story is far from over.

The acquisition marked VMware’s official entry into the ADC (Application Delivery Controller) space. The Avi team, which remains intact, is at the helm of delivering the world’s leading software-defined load balancing solution for VMware — both as a standalone platform for on-prem and multi-cloud environments and as an integrated VMware NSX solution.

We originally founded Avi Networks because we believed that the traditional ADC industry had failed its customers. Hardware and virtual appliances are rigid, cumbersome, and offer little automation or application insight. As enterprises re-architect applications as microservices, re-define the data center through software, and re-build infrastructure as hybrid and multi-cloud environments, ADC appliances work against the goals of modernizing enterprises.

This belief is shared by hundreds of the world’s largest companies that have decided to replace load balancing appliances with the Avi solution. VMware also believed this, which is why we are a part of the company today.

Avi re-imagined the ADC as a distributed software-defined fabric that is managed by a centralized controller. Automation, intelligence, and multi-cloud lives at the heart of our solution. Architecturally and philosophically, Avi and VMware couldn’t be more aligned.

I am incredibly proud of the accomplishments that the hundreds of Avi employees made over the past several years — from engineers developing a cutting edge platform with over 60 patents to our scrappy sales teams that broke into hundreds of enterprise accounts to every other employee that drove innovation, improved the customer experience, and shaped our culture.

As Avi, we were a disruptor in the industry, Publicly, our competitors dismissed us in hopes that the rest of the market would dismiss us too. Privately, they acknowledged that Avi’s architecture was the future and unsuccessfully tried to build and buy their way into creating an “Avi-killer”. As VMware, we will accelerate disruption and continue to outpace the legacy incumbents.

We have started a new chapter. We are now part of the industry’s only complete L2-7 networking portfolio defined completely in software for the multi-cloud era. Our product may have a new name, but  our team and mission will live on.

To Avi’s early adopters, thank you for trusting us and sharing in our vision. We look forward to growing our relationship even further as VMware.

To VMware customers, we are excited to provide you with the best ADC solution — for all your applications across data centers and clouds.

And to our competitors, you can no longer hide from us.

The post Avi Networks — Same Team, Same Mission, New Home appeared first on Network Virtualization.

VMworld US 2019: Networking and Security Recap

$
0
0

VMworld US 2019 has come to a close. If you didn’t attend, don’t worry as we still have VMworld Europe right around the corner. Join us November 4-7, 2019 to hear experts discuss cloud, networking and security, digital workspace, digital trends and more!  Register for VMworld Europe now.

Below is a quick recap and resources to check out from VMworld US 2019.

Stats from VMworld US 2019

VMware NSX Intelligence won TechTarget’s Best of Show award – Judge’s Choice for Disruptive Technology.

Congratulations to our NSX Intelligence team: Anirban Sengupta, Umesh Mahajan, Farzad Ghannadian, Kausum Kumar, Catherine Fan and Ray Budavari.

Surprise guest Michael Dell stopped by the Solutions Exchange to check out demos of what’s new from the networking and security business unit demoed by Chris McCain

Surprise guest Michael Dell stopped by the Solutions Exchange to check out demos of what’s new from the networking and security business unit demoed by Chris McCain.


Technical Networking and Security Sessions from VMworld US 2019

Below is a list of sessions that jump into the NSX platform around function and design that you don’t want to miss out on. Our technical experts covered all aspects of the NSX platform including VMware’s vision and future looks into the industry and how VMware is aligned to help our customers be at the forefront.

Networking Sessions

NSX-T Deep Dive: Logical Switching [CNET1511BU]

  • Speaker: Francois Tallet, Technical Product Manager, VMware

NSX-T Deep Dive: Layer 3 Routing [CNET1069BU]

  • Speaker: Amit Aneja, Sr Technical Product Manager, VMware

Load Balancing Session

NSX-T Deep Dive: Load Balancing [CNET1356BU]

  • Speaker: Dimitri Desmidt, Sr Technical Product Manager, VMware

Performance Session

NSX-T Deep Dive: Performance [CNET1243BU]

  • Speaker: Samuel Kommu, Sr Technical Product Manager, VMware

Automation and Policy Sessions

NSX-T Deep Dive: Automation from Install to Operations [CNET2648BU]

  • Speaker: Madhukar Krishnarao, Technical Product Manager, VMware

Using VMware NSX Policy and Analytics to Address Key Challenges in Security [SAI3071BU]

  • Speaker: Ray Budavari, Senior Staff Technical Product Manager, VMware

Network Automation with NSX-T and vRealize Automation [CNET2588BU]

  • Speakers: Thomas Vigneron, Senior Product Manager, VMware and Suman Sharma, Sr. Staff Solutions Architect, VMware

Operations Sessions

The NSX-T Platform in Practice: Install, Backup, Upgrade, Restore [CNET1251BU]

  • Speakers: Donald Zajic, NSX Staff Solutions Architect, VMware and Jing Shi, Sr. NSBU Technical Product Manager, VMware

Transitioning from NSX for vSphere to NSX-T [CNET1498BU]

  • Speaker: Andrew Voltmer, Director, Product Management, VMware

Security Sessions

Apply Consistent Security Across VMs, Containers, and Bare Metal [SAI1017BU]

  • Speaker: Ganapathi Bhat, Sr Technical Product Manager, VMware

NSX-T Advanced Security and Networking Service Insertion Deep Dive [SAI2781BU]

  • Speaker: Stijn Vanveerdeghem, Senior Technical Product Manager, VMware

Agentless Anti-Virus with NSX-T Guest Introspection Deep Dive [SAI1986BU]

  • Speaker: Geoff Wilmington, Senior Technical Product Manager, VMware

NSX-T Firewall Design and Deployment Best Practices [SAI1529BU]

  • Speakers: Anthony Burke, Solutions Architect, VMware and Dale Coghlan, Staff Solution Architect, VMware

Design Sessions

Next-Generation Reference Design with NSX-T: Part 1 [CNET2061BU]

Next-Generation Reference Design with NSX-T: Part 2 [CNET2068BU]

  • Speaker: Nimish Desai, Director, Technical Product Management, VMware

NSX-T Design for Multi-Site Networking and Disaster Recovery [CNET1334BU]

  • Speaker: Dimitri Desmidt, Sr Technical Product Manager, VMware

NSX-T Design for Small to Mid-Sized Data Centers [CNET1072BU]

  • Speaker: Amit Aneja, Sr Technical Product Manager, VMware and Gregory Smith, Technical Product Manager, VMware

NSX-T Design for VMware Validated Designs and VMware Cloud Foundation [CNET1908BU]

  • Speaker: Gregory Smith, Technical Product Manager, VMware

NSX-T and Horizon: Better Security and Performance for VDI [ADV1313BU]

  • Speaker: Graeme Gordon, Senior Staff EUC Architect, VMware and Geoff Wilmington, Senior Technical Product Manager, VMware

NSX and Cisco ACI: Running Your SDDC on a Cisco Underlay [CNET1474BU]

  • Speaker: Paul Mancuso, Technologist Director, Networking and Security, VMware

Containers / Cloud-Native Sessions

NSX-T Deep Dive: Kubernetes Networking [CNET1270BU]

  • Speaker: Yasen Simeonov, Sr Technical Product Manager, VMware

NSX-T Design for Pivotal Application Service (PAS) [CNET1244BU]

  • Speaker: Samuel Kommu, Sr Technical Product Manager, VMware

Introduction to Container Networking [CNET2604BU]

  • Speakers: Pooja Patel, Director, Technical Product Management, VMware and Bill Heilman, Solutions Architect, DominosPizza

Cloud Networking and Security Sessions

VMware Cloud on AWS: NSX-T Networking and Security Deep Dive [CNET1219BU]

  • Speakers: Humair Ahmed, Sr Technical Product Manager, VMware and Haider Witwit, VMware Specialist, AWS

NSX Cloud Deployment and Architecture Deep Dive [CNET1365BU]

  • Speakers: Amol Tipnis, Sr Technical Product Manager, VMware and Brian Heili, Cloud Strategist, VMware

Extend Your Network and Security to AWS, Azure, and IBM Cloud [CNET1582BU]

  • Speakers: Nikhil Kelshikar, VP NSX Products and Percy Wadia, Director, Product Management, VMware

NSX Cloud: Consistently Extend NSX to AWS and Azure [CNET1600BU]

  • Speaker: Percy Wadia, Director, Product Management, VMware

VMware Cloud with NSX on AWS, Dell EMC, and AWS Outposts [CNET2067BU]

  • Speakers: Venky Deshpande, Sr. Product Line Manager, VMware and Jake Kremer, Senior Network Engineer, Direct Supply, Inc

Future and Vision Sessions

vSphere Networking in the Data-Centric Future [HBI2136BU]

  • Speakers: Disha Chopra, Group Product Manager, VMware and Sudhanshu (Suds) Jain, Sr Product Management Leader, VMware

The Future of Networking with NSX [CNET1296BU]

  • Speakers: Bruce Davie, CTO, APJ, VMware and Marcos Hernandez, Chief Technologist – Networking and Security, VMware

Resources from VMworld US 2019

In case you missed attending VMworld here’s a recap of some of the resources you should check out ranging from the general sessions, interviews with our executive team, keynote sessions and more.

VMworld US 2019 General Sessions

VMworld 2019 US Day 1 General Session

  • Speakers:
    • Pat Gelsinger, CEO at VMware
    • Sanjay Poonen, COO at VMware

VMworld 2019 US Day 2 General Session

  • Speaker:
    • Ray O’Farrell, Cloud Native Division at VMware

theCUBE Live Interviews at VMworld US 2019

Networking and Security Show Case Keynote Sessions

Networking and Security for the Cloud Era

  • Speakers:
    • Tom Gillis, SVP/ GM of Networking and Security at VMware
    • Amit Pandey, Head of Application Services at VMware, former CEO Avi Networks
    • Jacob Rapp, Director and Lead Technologist, Networking and Security at VMware

Tom Gillis and Giuseppe Fiorentini from Pirelli get ready to take the stage to present NSX’s complete solution to provide the public cloud experience in your private cloud infrastructure

Tom Gillis and Giuseppe Fiorentini from Pirelli get ready to take the stage to present NSX’s complete solution to provide the public cloud experience in your private cloud infrastructure

Intrinsic Security – How Your VMware Infrastructure Can Turn the Tide in Cybersecurity

  • Speakers:
    • Tom Corn, SVP Security Products at VMware
    • Chris Corde, VP of Product Management at VMware
    • Shawn Bass, VP, CTO, End-User Computing at VMware

Other Resources from VMworld US 2019

Facebook Live Replays

If you didn’t catch our Facebook Live’s from VMworld with Sr VP/GM NSBU Tom Gillis, Networking and Security Business Unit CTO Pere Monclus and APJ CTO Bruce Davie watch them now.

Press Links from VMworld US 2019

The post VMworld US 2019: Networking and Security Recap appeared first on Network Virtualization.

VMware NSX Achieves FIPS 140-2 Validation

$
0
0

Co-authored with Rajiv Prithvi, Product Manager Networking and Security Business Unit at VMware

During VMworld US 2019, we announced several new transformative capabilities in VMware NSX-T 2.5 release which is now shipping! The release strengthens the NSX platform’s intrinsic security, multi-cloud, container, and operational capabilities.

We also announced the successful FIPS 140-2 validation of NSX-T 2.5. FIPS compliance is mandatory for US federal agencies and has also been widely adopted in non-governmental sectors (e.g. financial services, utilities, healthcare). FIPS-140-2 establishes the integrity of cryptographic modules in use through validation testing done by NIST and CSE. With this validation, we further deliver on our confidentiality, integrity and availability objectives and provide our customers with a robust networking and security virtualization platform.

Compliance-Based Configuration with NSX-T 2.5

NSX-T 2.5 is configured to operate in FIPS mode by default. Any exceptions or deviations from established compliance norms are identified in a compliance report which can be used to review and configure your NSX-T Data Center environment to meet your IT policies and industry standards. Any exceptions to FIPS compliance including configuration errors can be retrieved from the compliance report using NSX Manager UI or APIs.

A sample FIPS compliance report is shown below.

NSX Compliance Report


Exceptions and violations identified in the report help you configure NSX-T by feature or as a whole to operate in FIPS compliant mode. For example, in the compliance report shown above, the load-balancer module is called out as non-compliant as per FIPS requirements. You can then use the description and documented remediation steps to enable the global FIPS setting for the load-balancer to operate in FIPS compliant mode.

­See Compliance Status Report Codes for a detailed description of the various FIPS non-compliance codes and the corresponding suggested remediation steps.

Summary

Implementing FIPS validated encryption algorithms helps organizations in regulated industries and achieve compliance by ensuring that the cryptographic modules used meet well-defined security standards. With the completion of FIPS 140-2 validation for NSX Data Center, we’re excited that our customers can now take full advantage of the security and ease-of-use of the NSX platform while ensuring their applications are available, optimized, and protected.

You can learn more about FIPS 140-2 validation of NSX-T 2.5 using the following resources:

VMware NSX-T Compliance Resources

NIST Resources

Other NSX-T Resources

The post VMware NSX Achieves FIPS 140-2 Validation appeared first on Network Virtualization.

Viewing all 481 articles
Browse latest View live


<script src="https://jsc.adskeeper.com/r/s/rssing.com.1596347.js" async> </script>